Learn how to create an invoice in Xero and streamline your accounting
Check out our detailed guide on creating a Xero invoice. Learn how Xero accounting software makes invoicing simpler and more efficient.
Xero is a user-friendly accounting platform designed for small and medium-sized businesses around the globe. Companies use it to automate bookkeeping tasks, track projects, manage finances, and generate detailed reports on business spending.
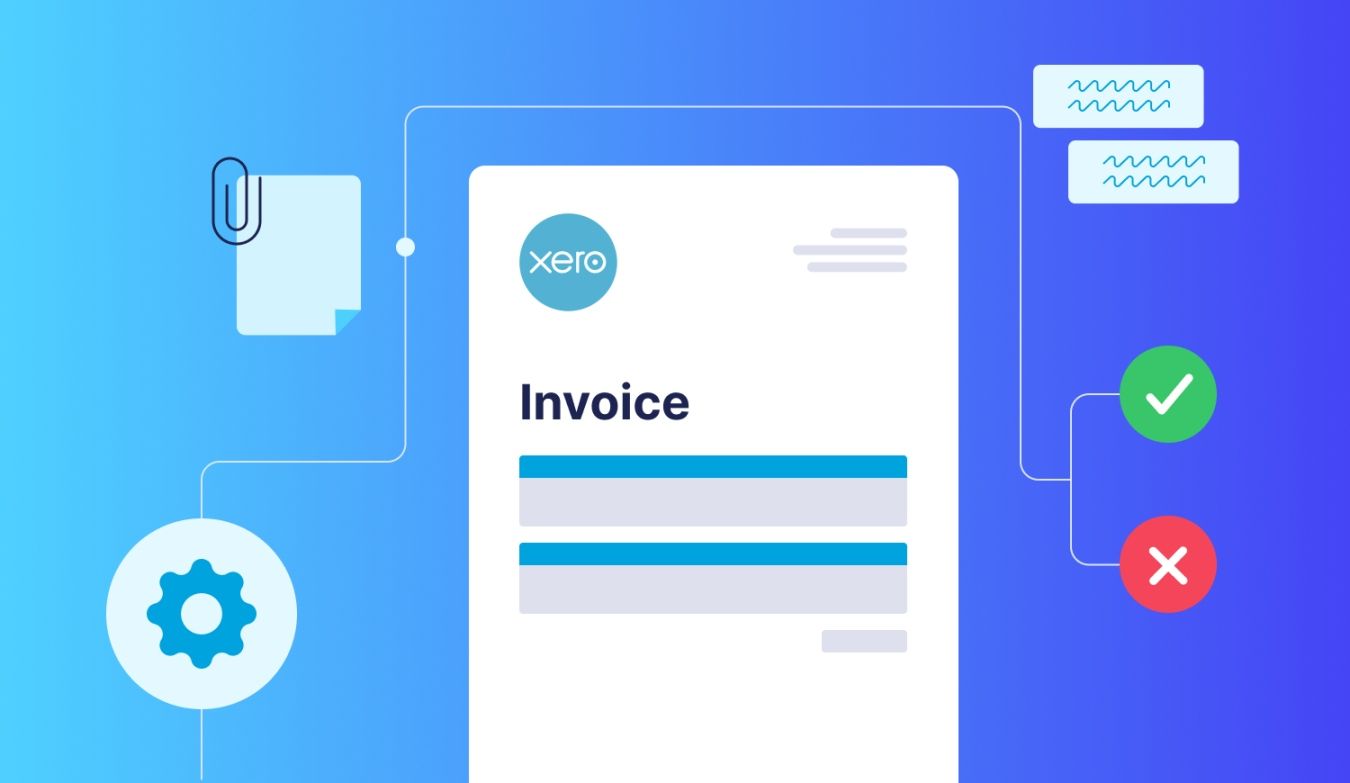
One of the system’s strengths is the Xero new invoicing module, which makes handling payments simple and stress-free. Are you curious about how e-invoicing works and how to create an invoice in Xero? This article covers all the basics and includes a Xero invoice example.
- How Xero e-invoicing works
- How to create an invoice in Xero
- Types of Xero invoices you can create
- Streamlined invoicing and data sync with Precoro integration
- Frequently Asked Questions
How Xero e-invoicing works
E-invoicing in Xero is a fast and straightforward way to get your invoices to customers without any delays or extra steps. Instead of manually creating, printing, and mailing invoices, you can create and send them with just a few clicks.
Additionally, Xero billing ensures fewer mistakes, less time spent on admin, and faster payments — all while keeping invoices organized in one system. Here’s why using Xero invoices is a win for companies:
- Personalized Xero invoice templates
Users can easily create professional, branded Xero invoices by customizing templates to include their logo and payment terms. - More ways for customers to pay
Suppliers can let customers pay quickly and conveniently with a straightforward Pay Now option directly from the Xero invoice. Customers can choose from multiple payment methods like debit/credit cards or popular providers like Stripe and GoCardless. - Secure payments with trusted providers
Businesses can rest easy knowing that payments for Xero invoices are secure and protected from fraud. - Faster payments with automated reminders
The finance team can minimize the risk of late payments and set up automated reminders to nudge customers and speed up payment processing for Xero invoices. - Invoice processing on the go with the Xero invoice app
Xero offers a mobile app that allows users to create and send invoices on the go, track invoice status, and receive instant notifications about payment updates. - Visible invoice statuses
Xero e-invoicing allows companies to stay organized with a clear view of all pending and paid invoices. - Automatic syncing for seamless accounting
Xero automatically syncs invoices with the company’s accounting records, eliminating the need for manual data entry. Thus, Xero billing ensures that financial records are always accurate and up-to-date, streamlining the accounting process.
How to create an invoice in Xero
Xero currently offers two versions of the invoice creation interface: Classic and New. The Classic version provides more manual control over design and layout but lacks some automation features. The Xero New invoicing experience offers a more streamlined, modern design focused on usability and simplicity.
Since the Classic version will be discontinued on February 27, 2025, we’ll focus on the steps for using the Xero New invoicing module. Here’s how to create an invoice in Xero:
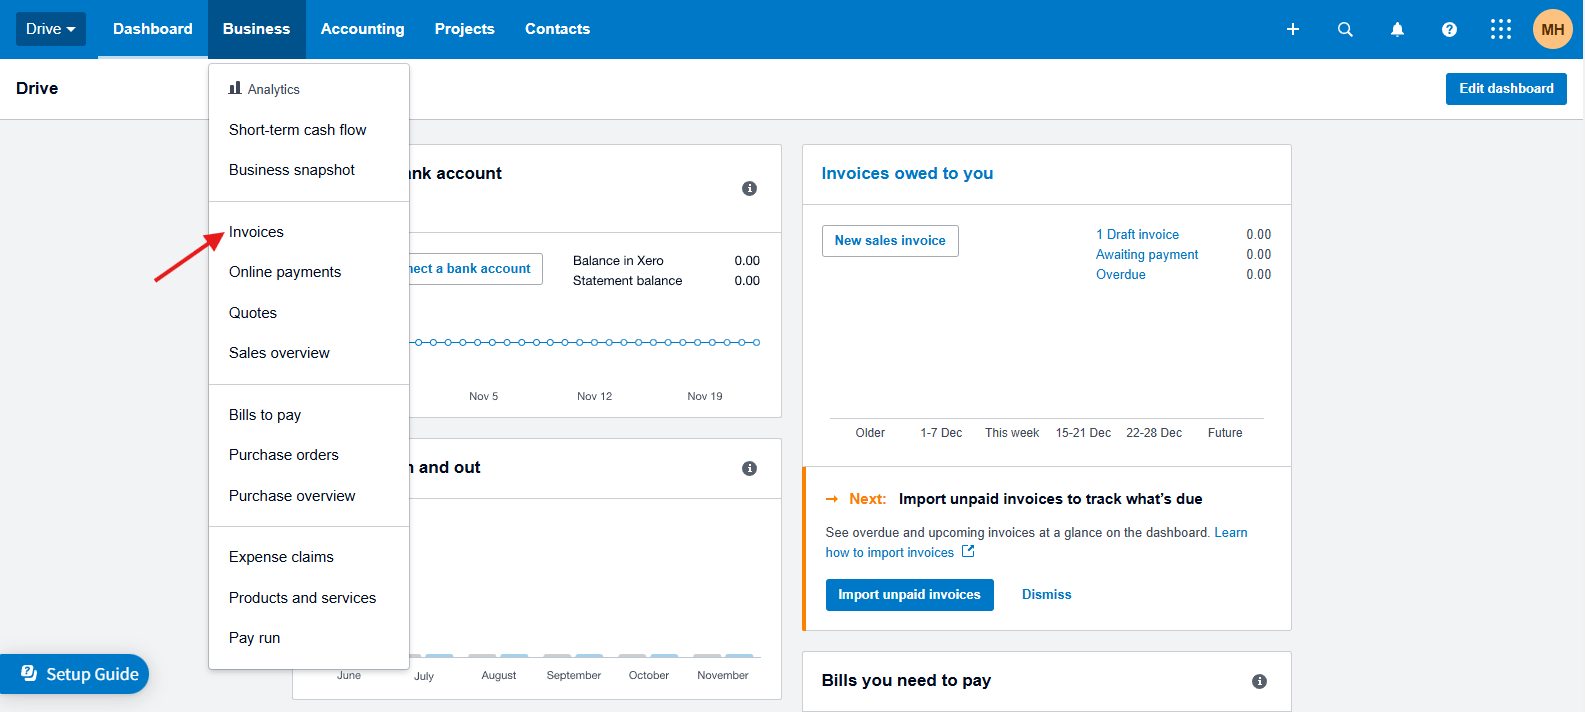
- Navigate to the Invoices Section
Once logged into your Xero account, click on the Business menu in the top navigation bar. Then, select Invoices from the drop-down list. This will take you to the invoices overview page.
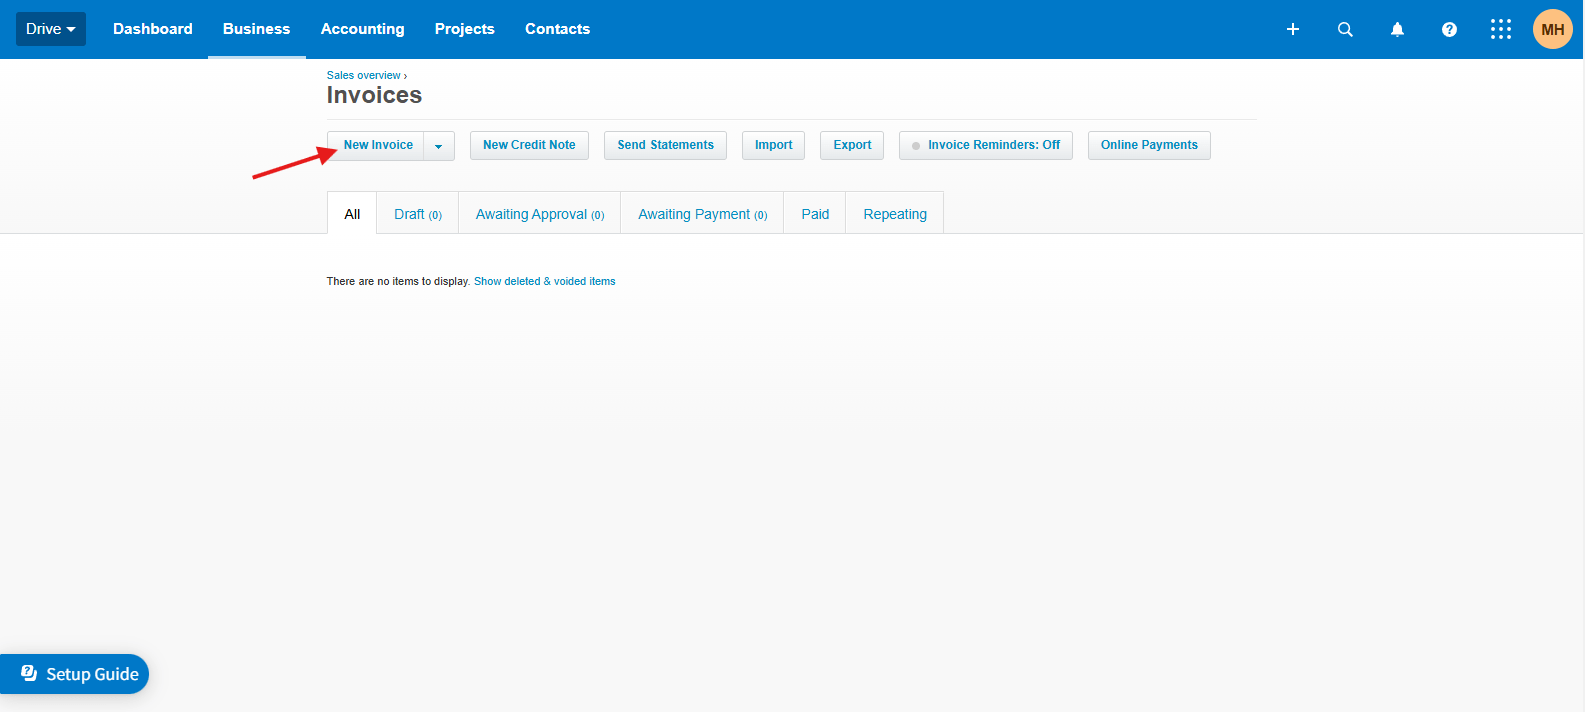
- Create a new invoice
On the Invoices page, click the New Invoice button. This will open a new invoice form. To set up a recurring invoice, click the drop-down arrow next to New Invoice and select New Repeating Invoice instead.
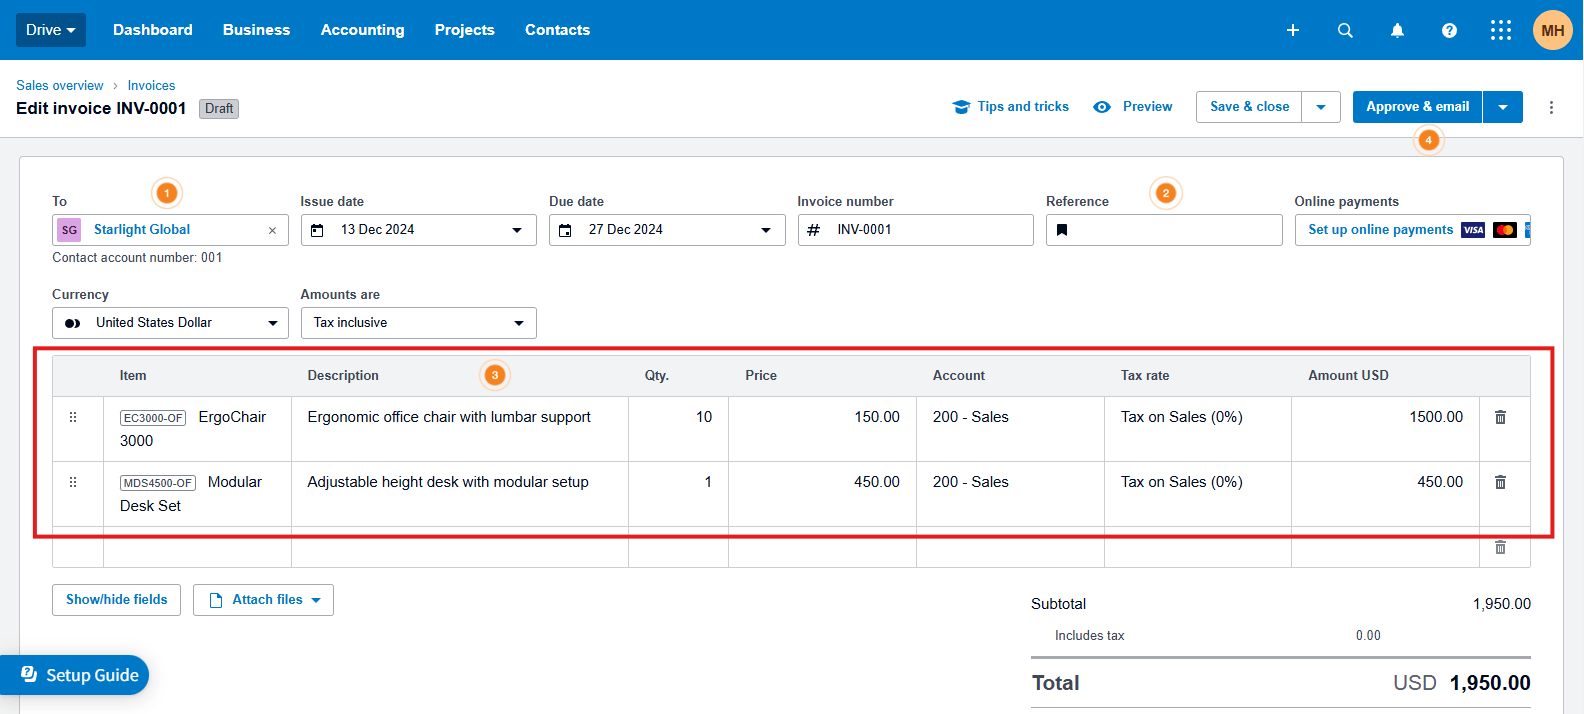
- Fill in all the required details
In the To field, select the customer you want to invoice from the drop-down menu. If the customer isn’t in your contacts yet, you can create a new contact by clicking Add new contact and entering their details. Then, fill in the invoice details such as invoice date, due date, reference number (a purchase order number), and payment terms.
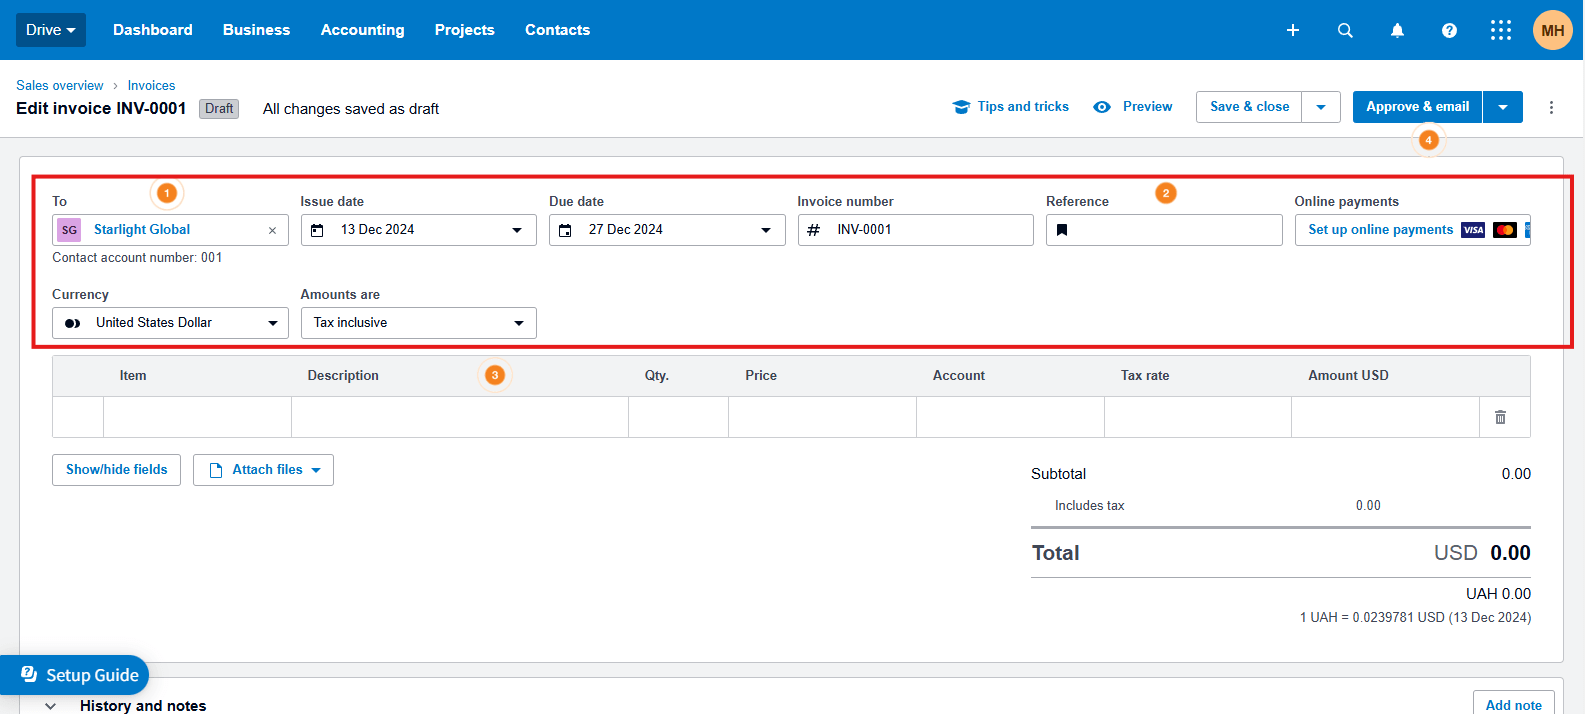
- Add line items
Under the Item column, enter the products or services you’re invoicing for. You can select from predefined items if you’ve set up inventory or services in Xero, or you can manually add descriptions, quantities, prices, and TAX info.
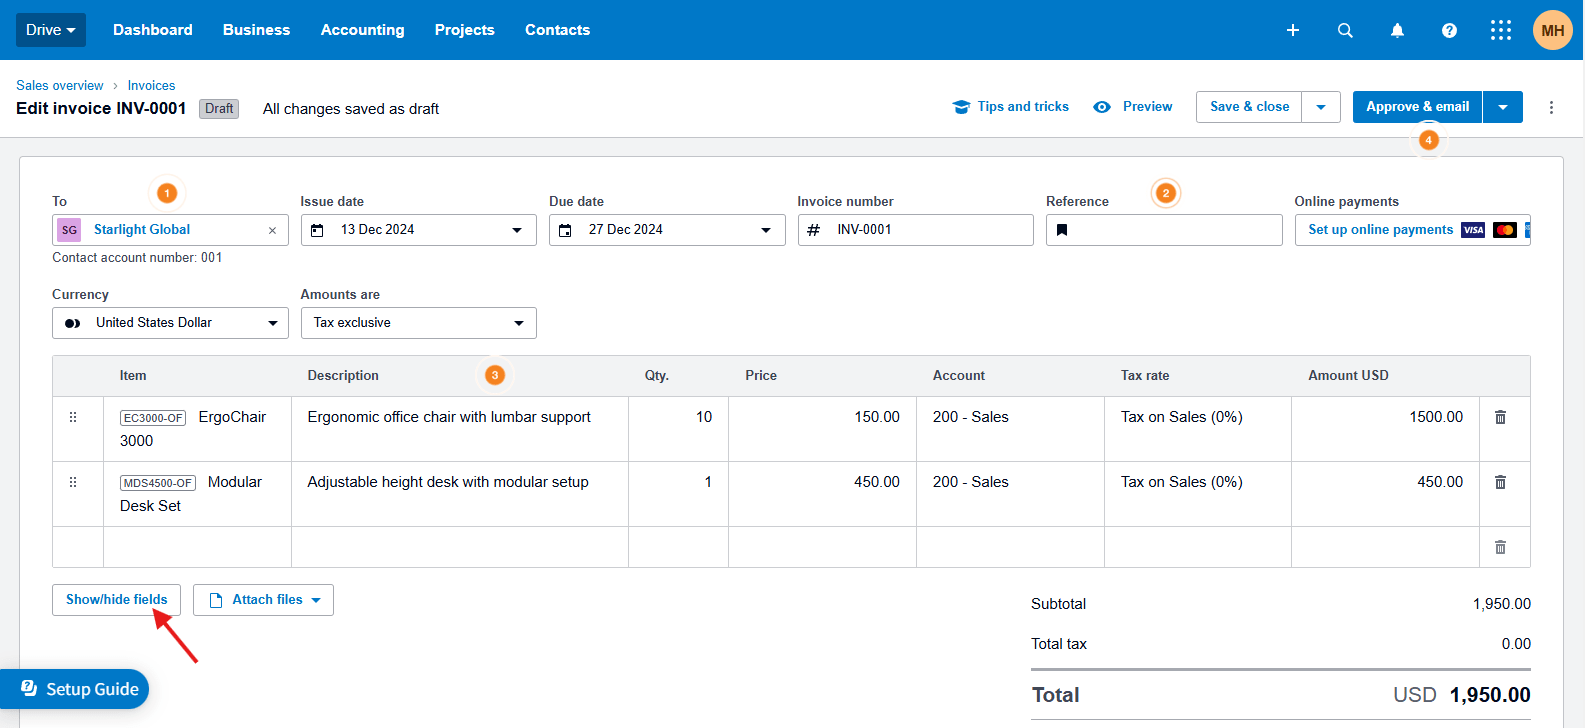
- Add additional information (optional)
You can click Show/hide fields to add a discount, shipping fees, or payment instructions in the relevant sections to the Xero invoice.

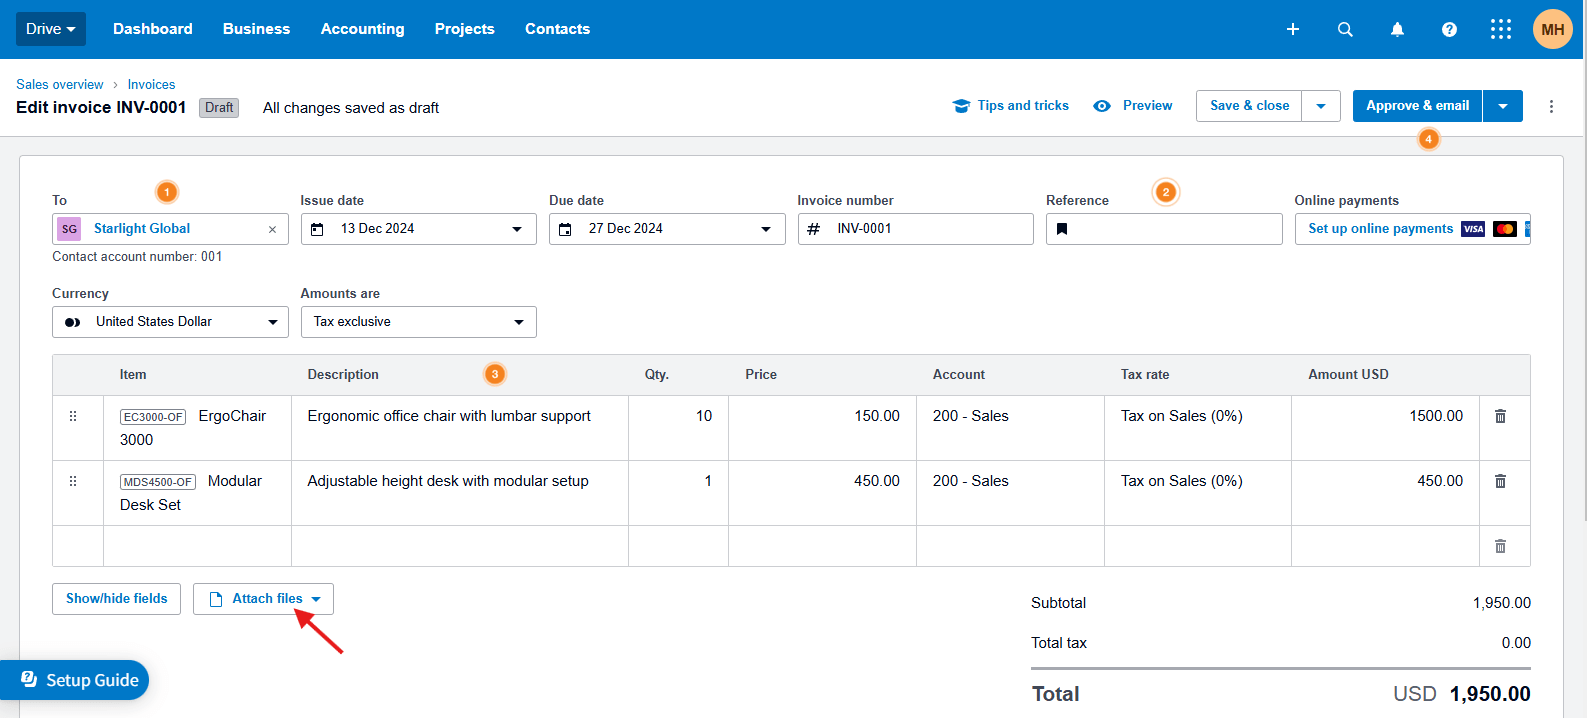
- Attach additional files (optional)
Click Attach files to provide supporting documentation to the Xero invoice, such as certificates of compliance, warranty information, or purchase orders.
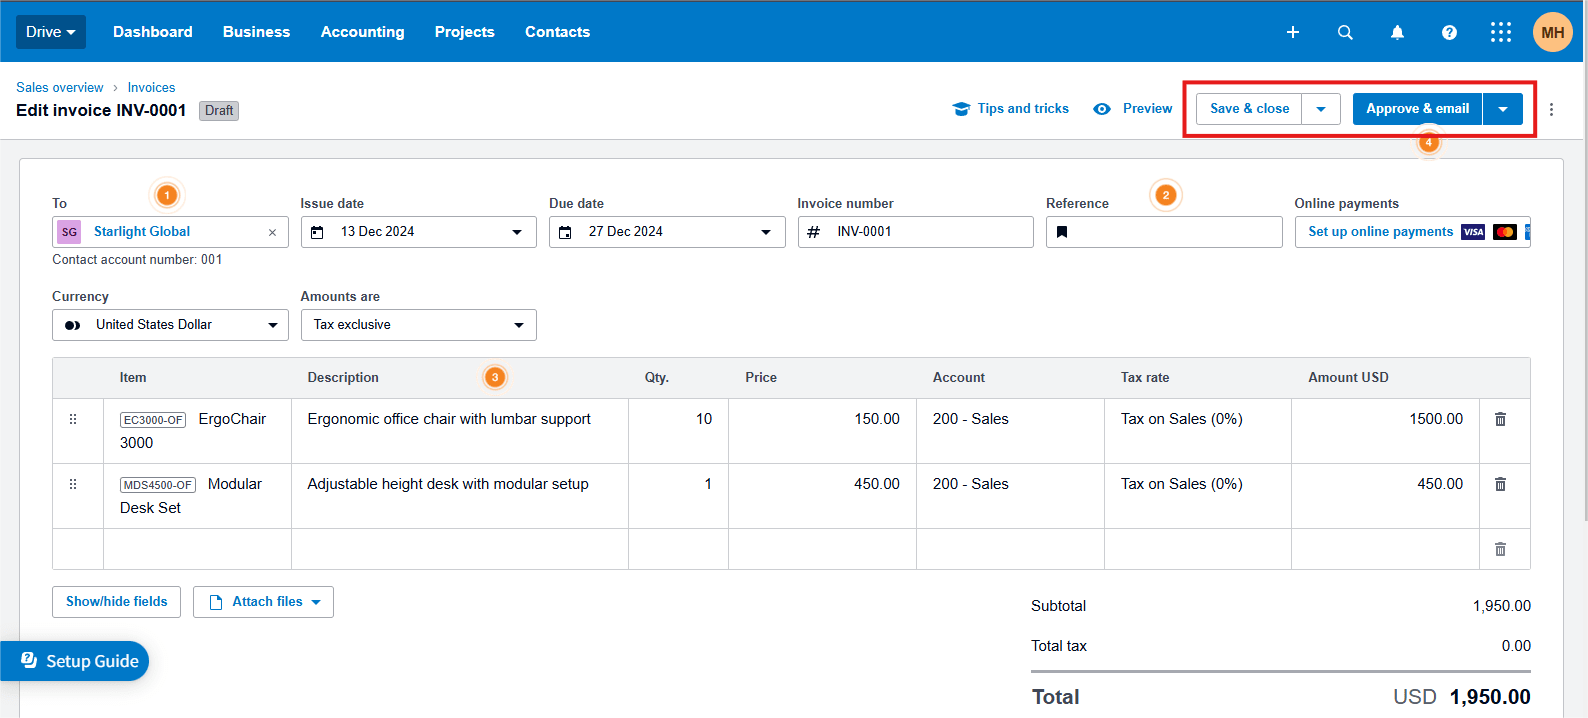
- Finalize the Xero invoice
You can preview the invoice to make sure all the details are correct and then choose from two options:
- Click Save & close to save the invoice without sending it to the customer. It allows you to make edits or finalize the invoice later.
- Click Approve & email to approve the Xero invoice and immediately email it to the customer. This step finalizes the invoice and typically updates the accounting records.
After sending the document, the accounting team can easily track invoice statuses. Once payment is received, it’s important to mark a Xero invoice as paid to keep records updated. If your bank account is synced with Xero, payments can be automatically recorded, streamlining the process.
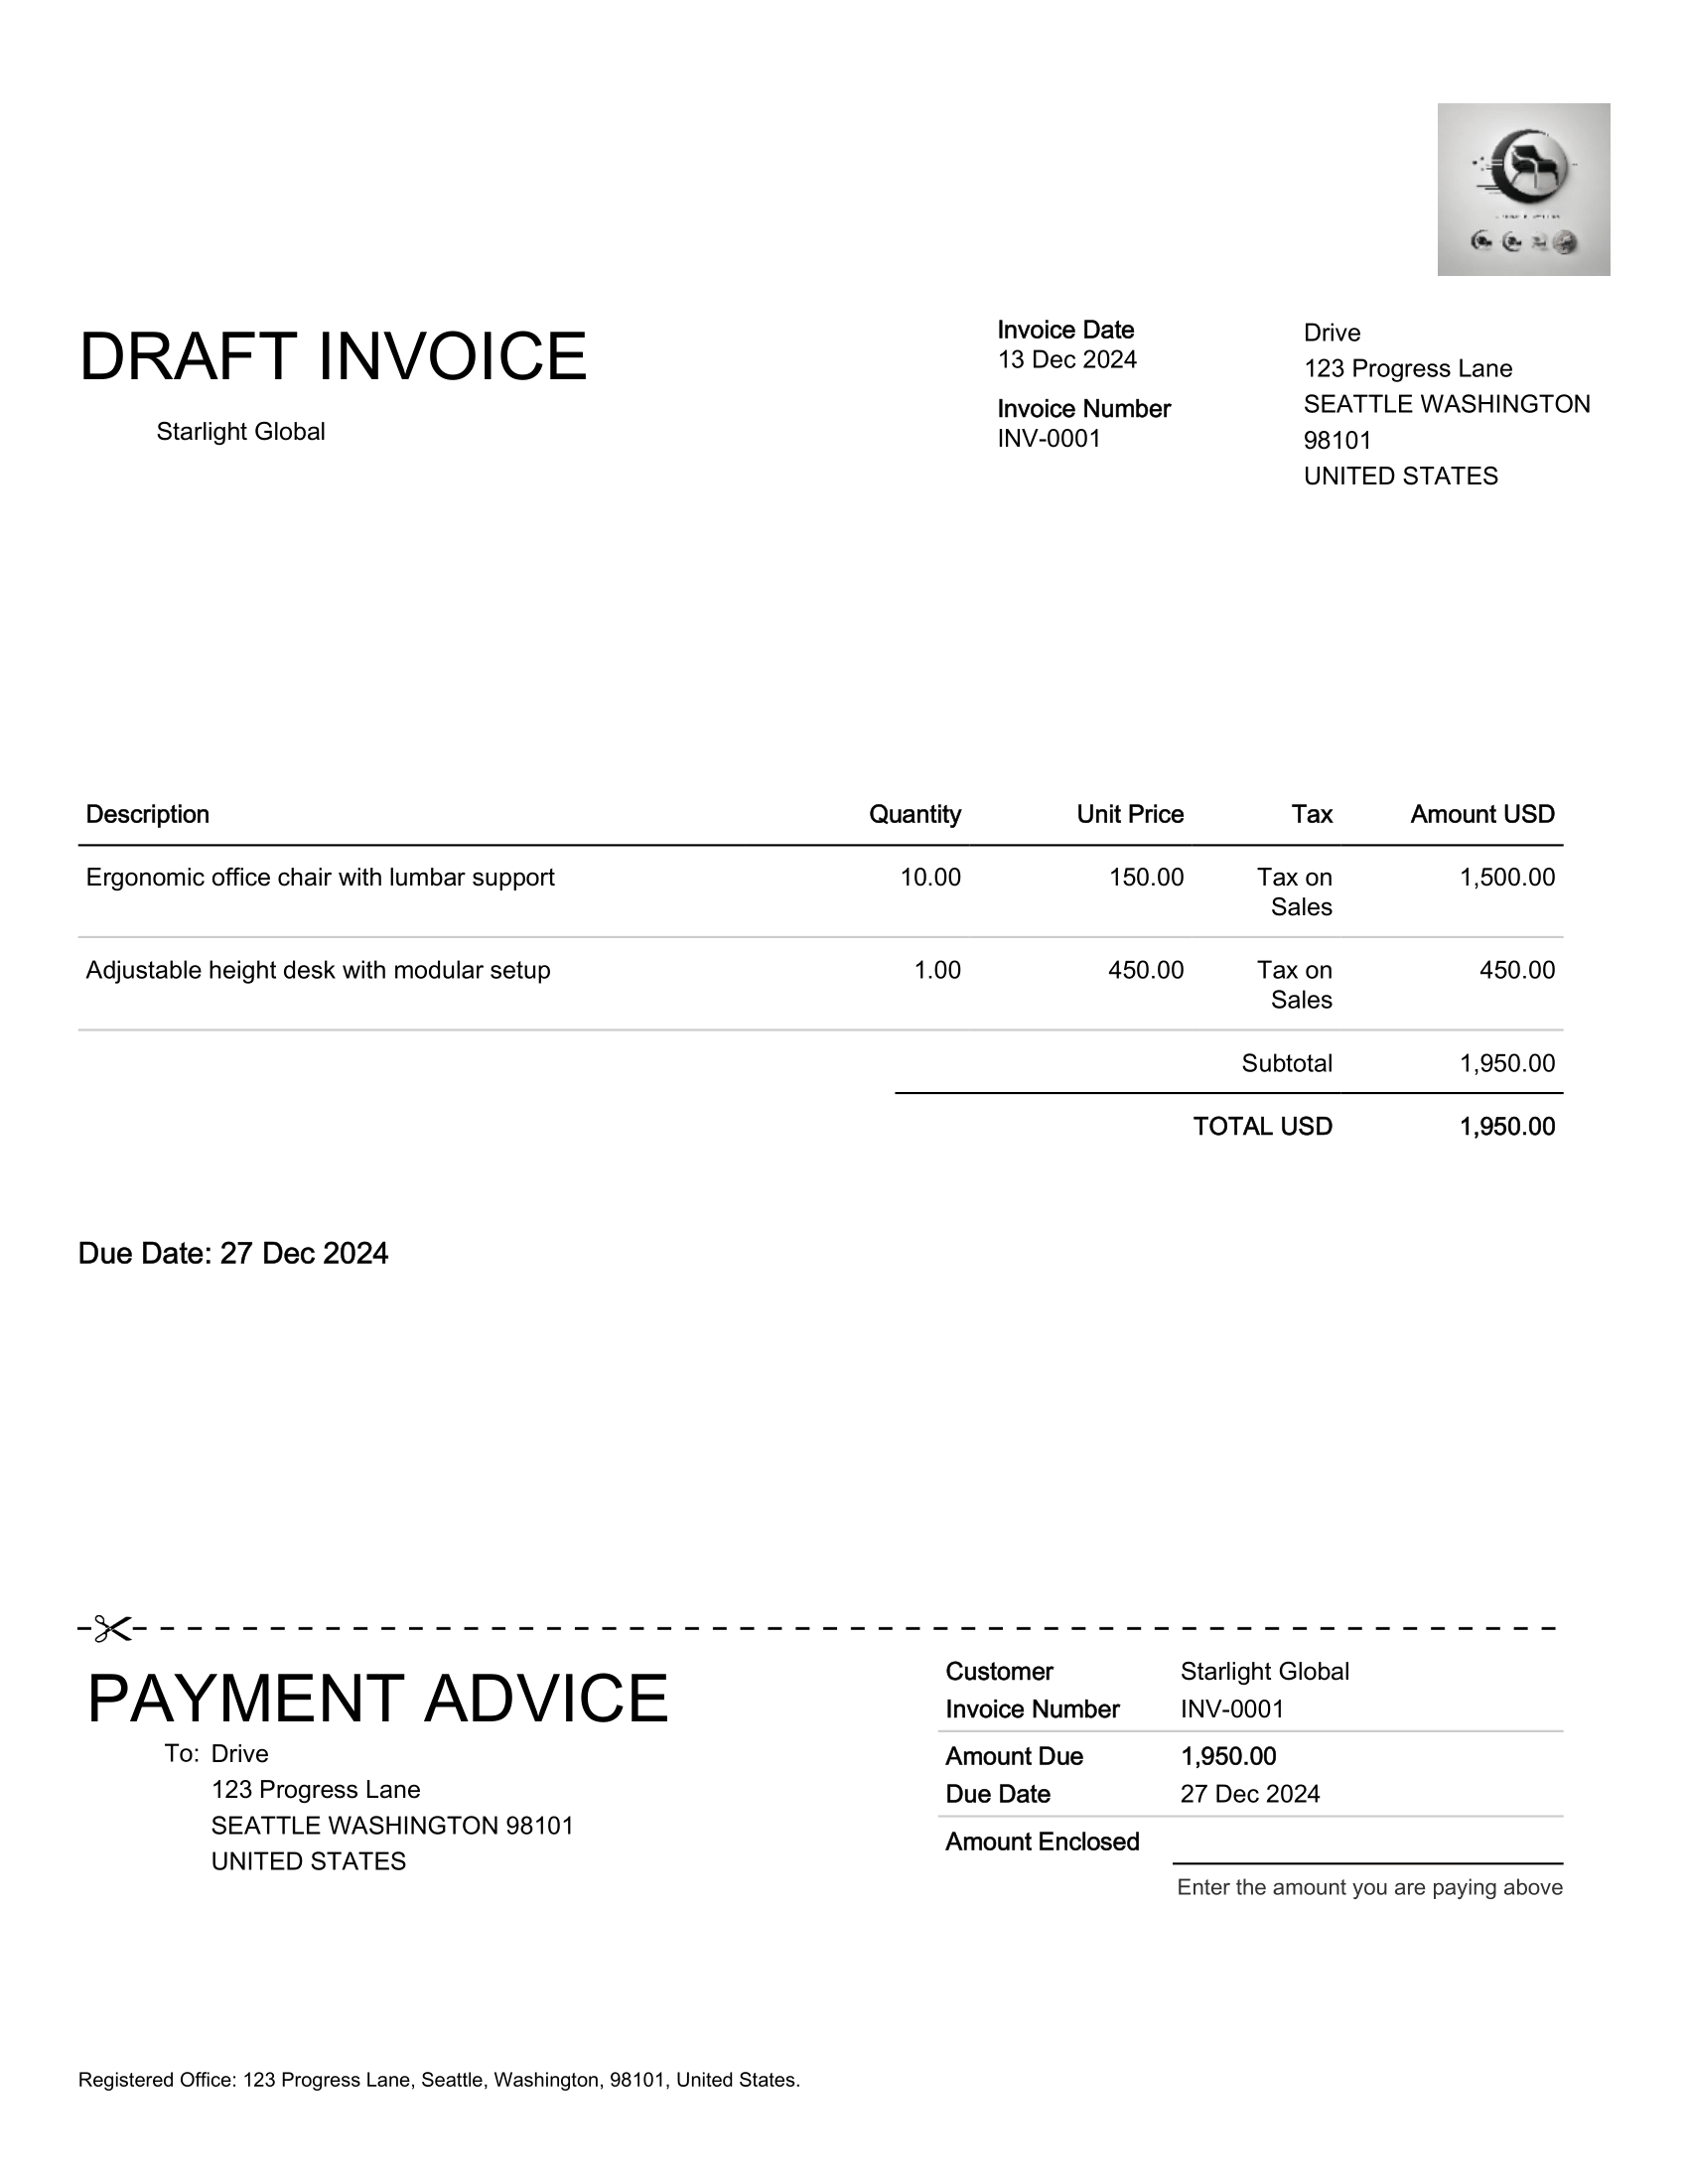
That’s how Xero’s New invoicing module works! Below is a Xero invoice example:
Types of Xero invoices you can create
Xero billing offers flexible invoicing options that adapt to different billing cycles and customer relationships. Here’s an overview of the types of Xero invoices you can create:
Standard Xero invoice
This is the most common Xero invoice example, where businesses create invoices for individual products or services with details like descriptions, amounts, tax rates, and due dates. This type of invoice is especially suitable for businesses with irregular billing cycles, such as freelancers, consultants, or companies offering project-based services.
Repeating Xero invoice
A repeating Xero invoice setup is perfect for businesses that deal with recurring charges, such as monthly subscriptions, retainer services, or regularly scheduled deliveries. Instead of manually creating an invoice for every billing cycle, companies can automate the process with repeating Xero invoices. These are automatically generated and sent on a regular schedule (for example, weekly or monthly), saving you time and reducing the risk of human error.
Credit note
A credit note is a document used to adjust the amount of a previously issued invoice, often for refunds, returns, or discounts. In Xero, you can easily create credit notes linked to the original invoice and either refund the customer or apply the credit to future invoices.
This functionality of Xero billing ensures accurate financial records, simplifies adjustments, and helps maintain strong customer relationships by addressing issues promptly. Credit notes also improve transparency and compliance in your accounting.
Quote (estimate)
A quote, also called an estimate, is a document you send to a customer to propose pricing and terms for a product or service before starting the work. While it’s not a formal invoice, a quote outlines the project’s costs, quantities, and conditions, giving the customer clarity upfront. In Xero, quotes are easy to create and share with your clients.
Once the customer accepts the terms, you can quickly convert the quote into a finalized Xero invoice, eliminating the need for manual data re-entry and reducing errors. This Xero billing feature is ideal for businesses like construction, consulting, or creative services that need to provide detailed estimates upfront. It streamlines the pre-billing process, improves communication, and ensures a smooth transition from quote to payment.
Each type of invoice is designed to make your life easier by offering flexibility and ensuring that Xero billing meets the specific needs of your business.
Streamlined invoicing and data sync with Precoro integration
Invoicing is just one part of the overall purchasing process. That’s why it’s important to ensure clear and smooth data transfer between the accounting and procurement teams. Precoro is a procurement centralization platform that seamlessly integrates with Xero and helps businesses automate critical processes such as intake management, purchasing, supplier management, and reporting.
Here’s how the Xero invoice app and Precoro procurement centralization platform deliver more value together:
Easy adoption
A company can connect its Precoro and Xero accounts via a link or with a simple click of a button. Choose import options by ticking a few boxes, and you are ready to roll.
Automatic data sync
Accounting and procurement functions can keep everything in sync — purchase orders, invoices, contacts, and tax rates — with zero manual effort. This seamless integration between Precoro’s procurement modules and Xero billing capabilities ensures real-time updates and minimizes errors or data mismatches.
Fully configurable documents
Users can easily pull and customize documents in Precoro, including adding notes and attachments. With unlimited custom fields for items, Precoro offers full flexibility to tailor data exchange exactly to a company’s needs.
Streamlined procurement and accounting
Your procurement team can manage purchase requisitions, orders, and suppliers in Precoro, while your accounting team handles payments in Xero — all with the same accurate data. Both teams are on the same page, reducing confusion and improving collaboration. It’s the ultimate tag-team effort.
Easier compliance and reporting
Precoro ensures your procurement processes comply with company policies and regulations, while Xero billing features help to handle the accounting side. With everything synced up, reporting becomes a breeze, and audits are far less stressful, especially with Precoro’s preset and custom reports. Your business stays compliant without the extra hassle.
In short, the Xero-Precoro integration makes your life easier by automating tedious tasks, giving you real-time insights, and improving collaboration between accounting, finance, and procurement teams. It’s like having a supercharged team working behind the scenes — saving you time, reducing errors, and helping stakeholders make smarter, cost-effective decisions.

Frequently Asked Questions
Xero is an online accounting software used to manage financial tasks like invoicing, bank reconciliation, expense tracking, and financial reporting. It’s designed to help small and medium-sized businesses manage their finances more easily and efficiently.
An invoice is a document sent to your customers to request payment for products or services you’ve provided. In Xero, invoices are typically associated with revenue and sales. A bill, on the other hand, is a document you receive from suppliers or vendors for products or services you’ve purchased. It represents an amount you owe, which you can pay later. In Xero, bills are tracked as expenses.
Invoicing in Xero has several benefits:
- Businesses can email invoices directly from Xero, speeding up the process of getting paid.
- Xero billing can automate recurring invoices, saving you time on manual entry.
- Companies can customize their invoices with the branding, ensuring they look professional.
- Businesses can nudge customers with reminders to avoid late payments for Xero invoices.
- Xero integrates with the bank accounts, so payments can be easily reconciled with invoices.
- Users can pay Xero invoices with a simple click of a button.
If you’ve set up online payment options (such as Stripe, PayPal, or GoCardless), customers can pay Xero invoices directly from the invoice email. Xero also provides an option to include bank account details on the invoice for payments via bank transfer.
Xero does not automatically send invoices by default. However, you can set up repeating Xero invoices for regular payments, which will be automatically generated and sent on the schedule you choose. Standard Xero invoices will need to be manually created and sent, though you can automate reminders for overdue invoices.
For the Starter plan, there’s a limit of 20 quotes and invoices while other pricing plans don’t include a specific monthly invoice limit for Xero billing capabilities.
Invoicing doesn’t have to be complicated
Xero’s New invoicing capabilities make managing your business finances a whole lot easier. Whether you’re creating invoices, tracking payments, or managing expenses, it keeps accounting tasks simple, organized, and efficient. Moreover, when you pair the Xero invoice app with Precoro, you supercharge your overall procurement process, automating data exchange and improving collaboration between accounting and procurement teams.
Looking for a procurement platform that seamlessly integrates with Xero?


