7 min read
How to Create a Xero Purchase Order
Discover how to create a Xero purchase order in minutes. Follow this guide to simplify purchasing and improve expense tracking.
Effective procurement starts with a structured purchase order (PO) management. That is where Xero's purchase order tool excels. It is a cloud-based accounting solution that simplifies purchasing, tracks orders and maintains accurate financial records.
This guide will walk you through creating Xero purchase orders and optimization for better integration.
What Is a Purchase Order in Xero?
How to Create a Xero Purchase Order
How to Edit or Delete a Xero Purchase Order
Benefits of Digitizing Purchase Orders in Xero
Direct Precoro Integration with Xero
Frequently Asked Questions
What Is a Purchase Order in Xero?
A Xero purchase order is the document the buyer sends to the seller to order the needed goods or services. In simple terms, it's a list with detailed information on the necessary stuff for the buyer. It includes:
- Purchase order number.
- Overall seller and buyer information (company's name, address, and additional contacts).
- Creation and delivery dates.
- Order description, including the required number of items and their prices.
- Payment terms and conditions.
Download the free Xero purchase order template and preview it firsthand to see how it fits your workflow.
How to Create a Xero Purchase Order
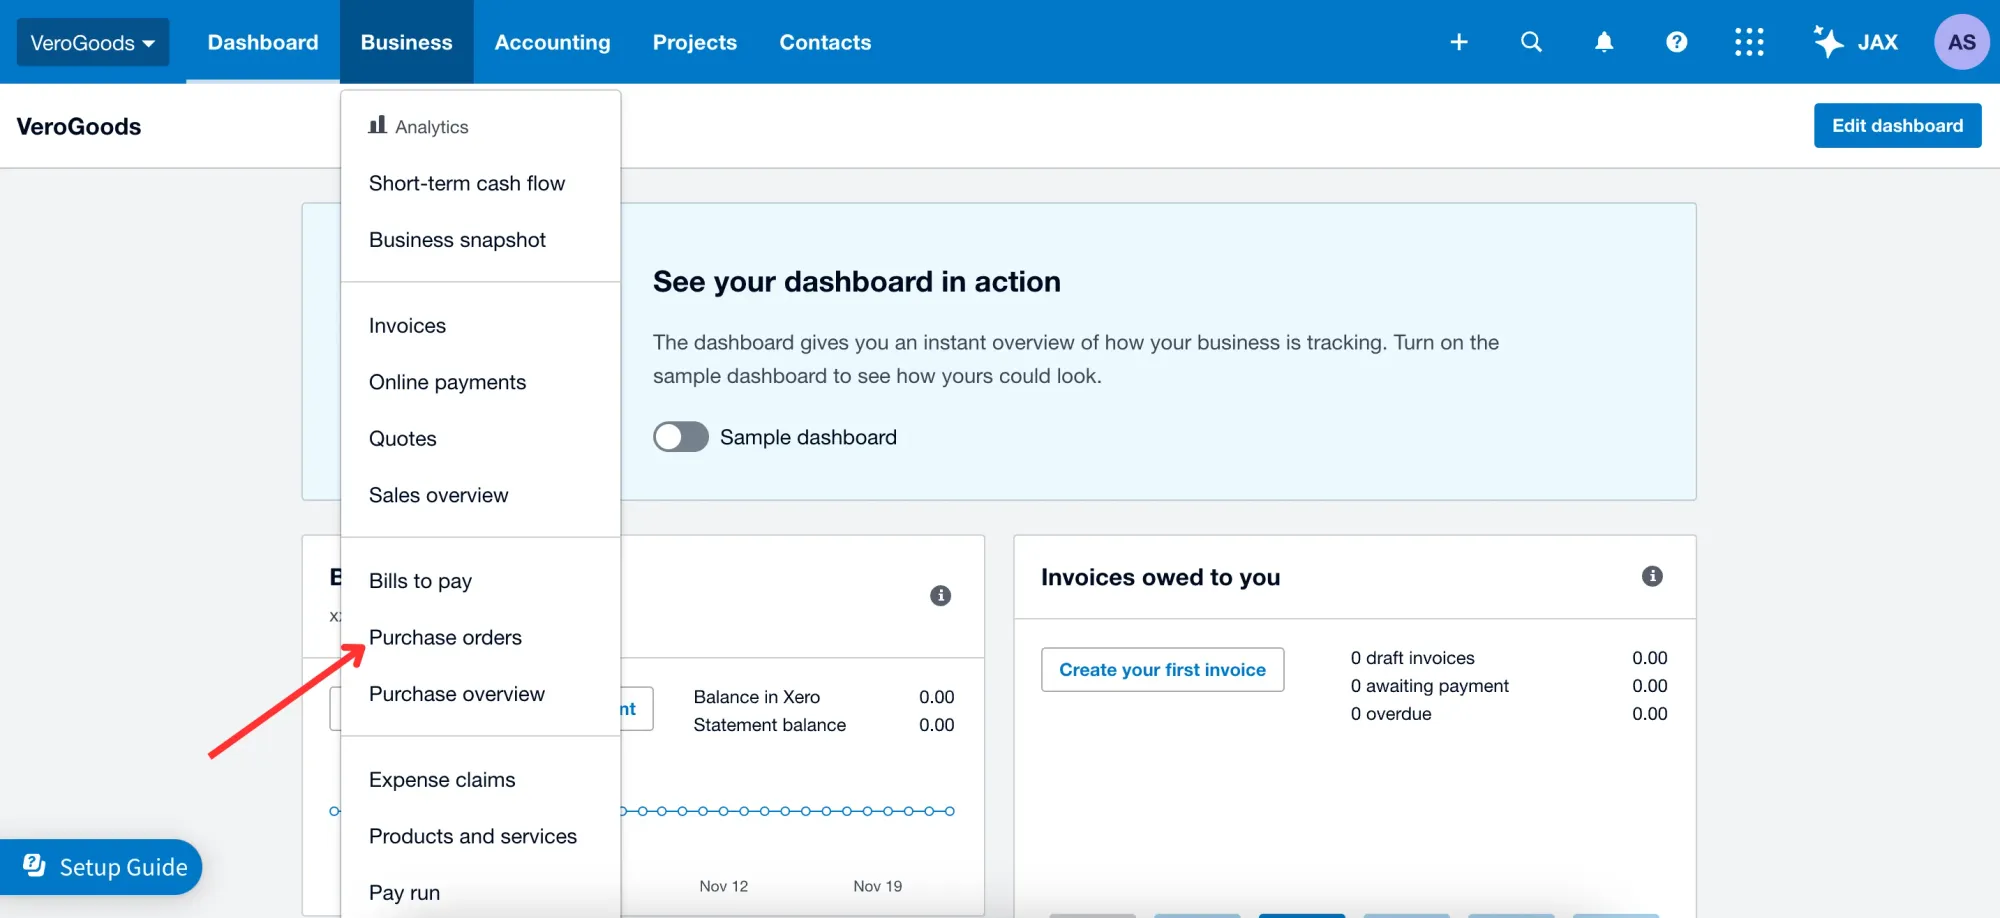
1. Open the "Business" tab in the header and select the "Purchase orders" module.
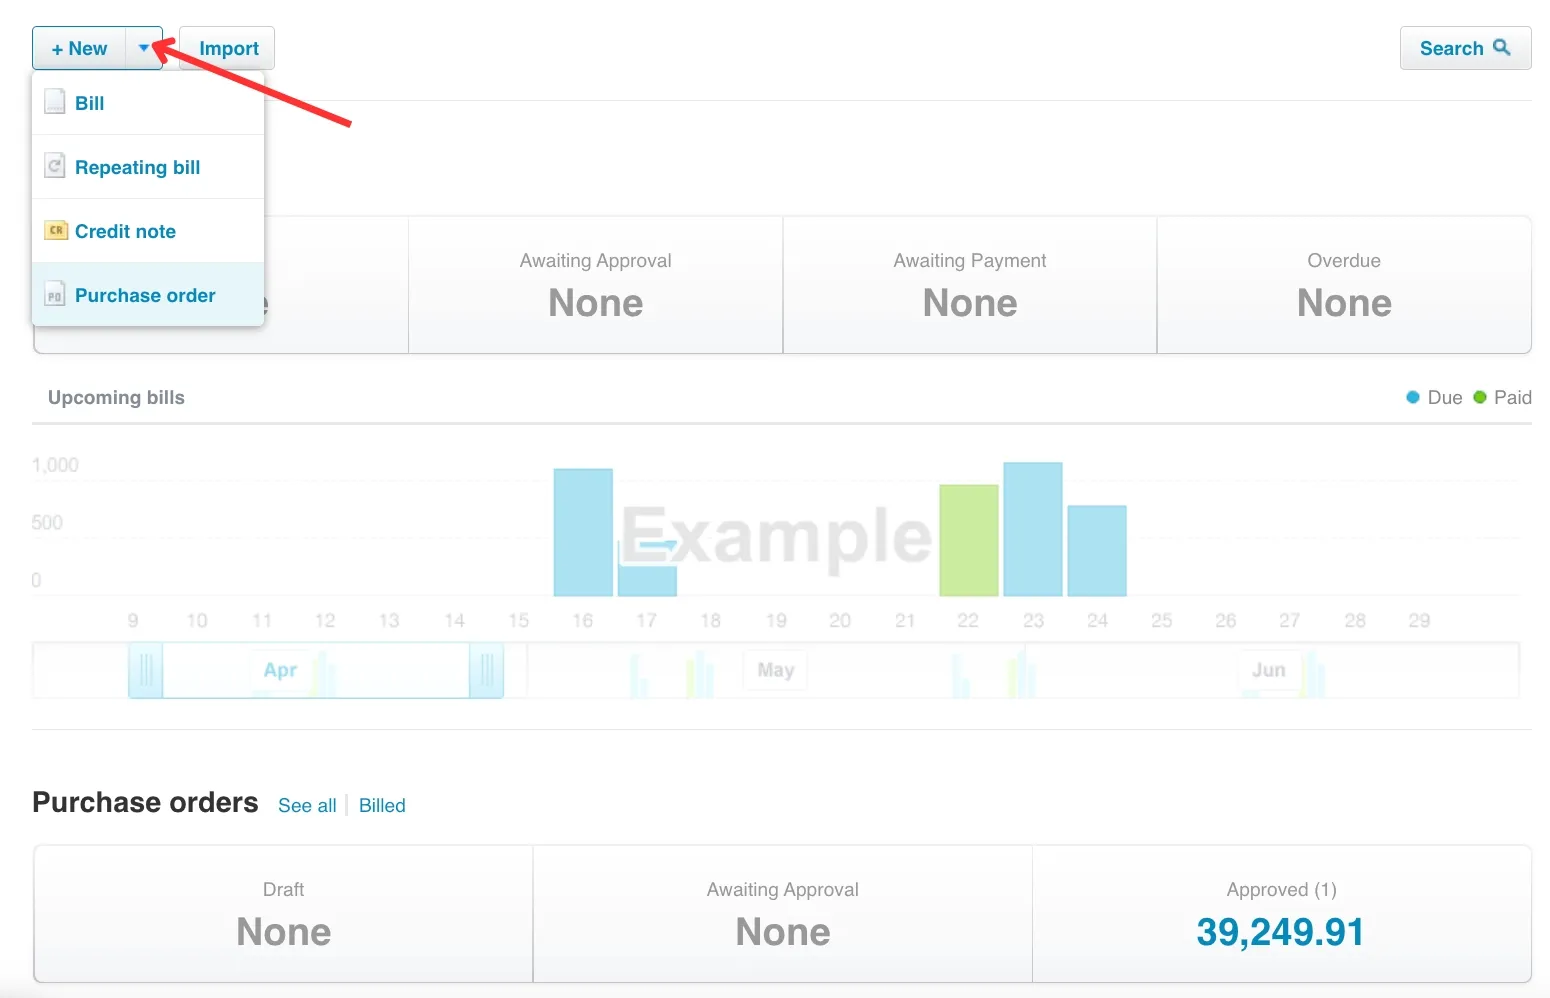
2. Click the "New purchase order" button.

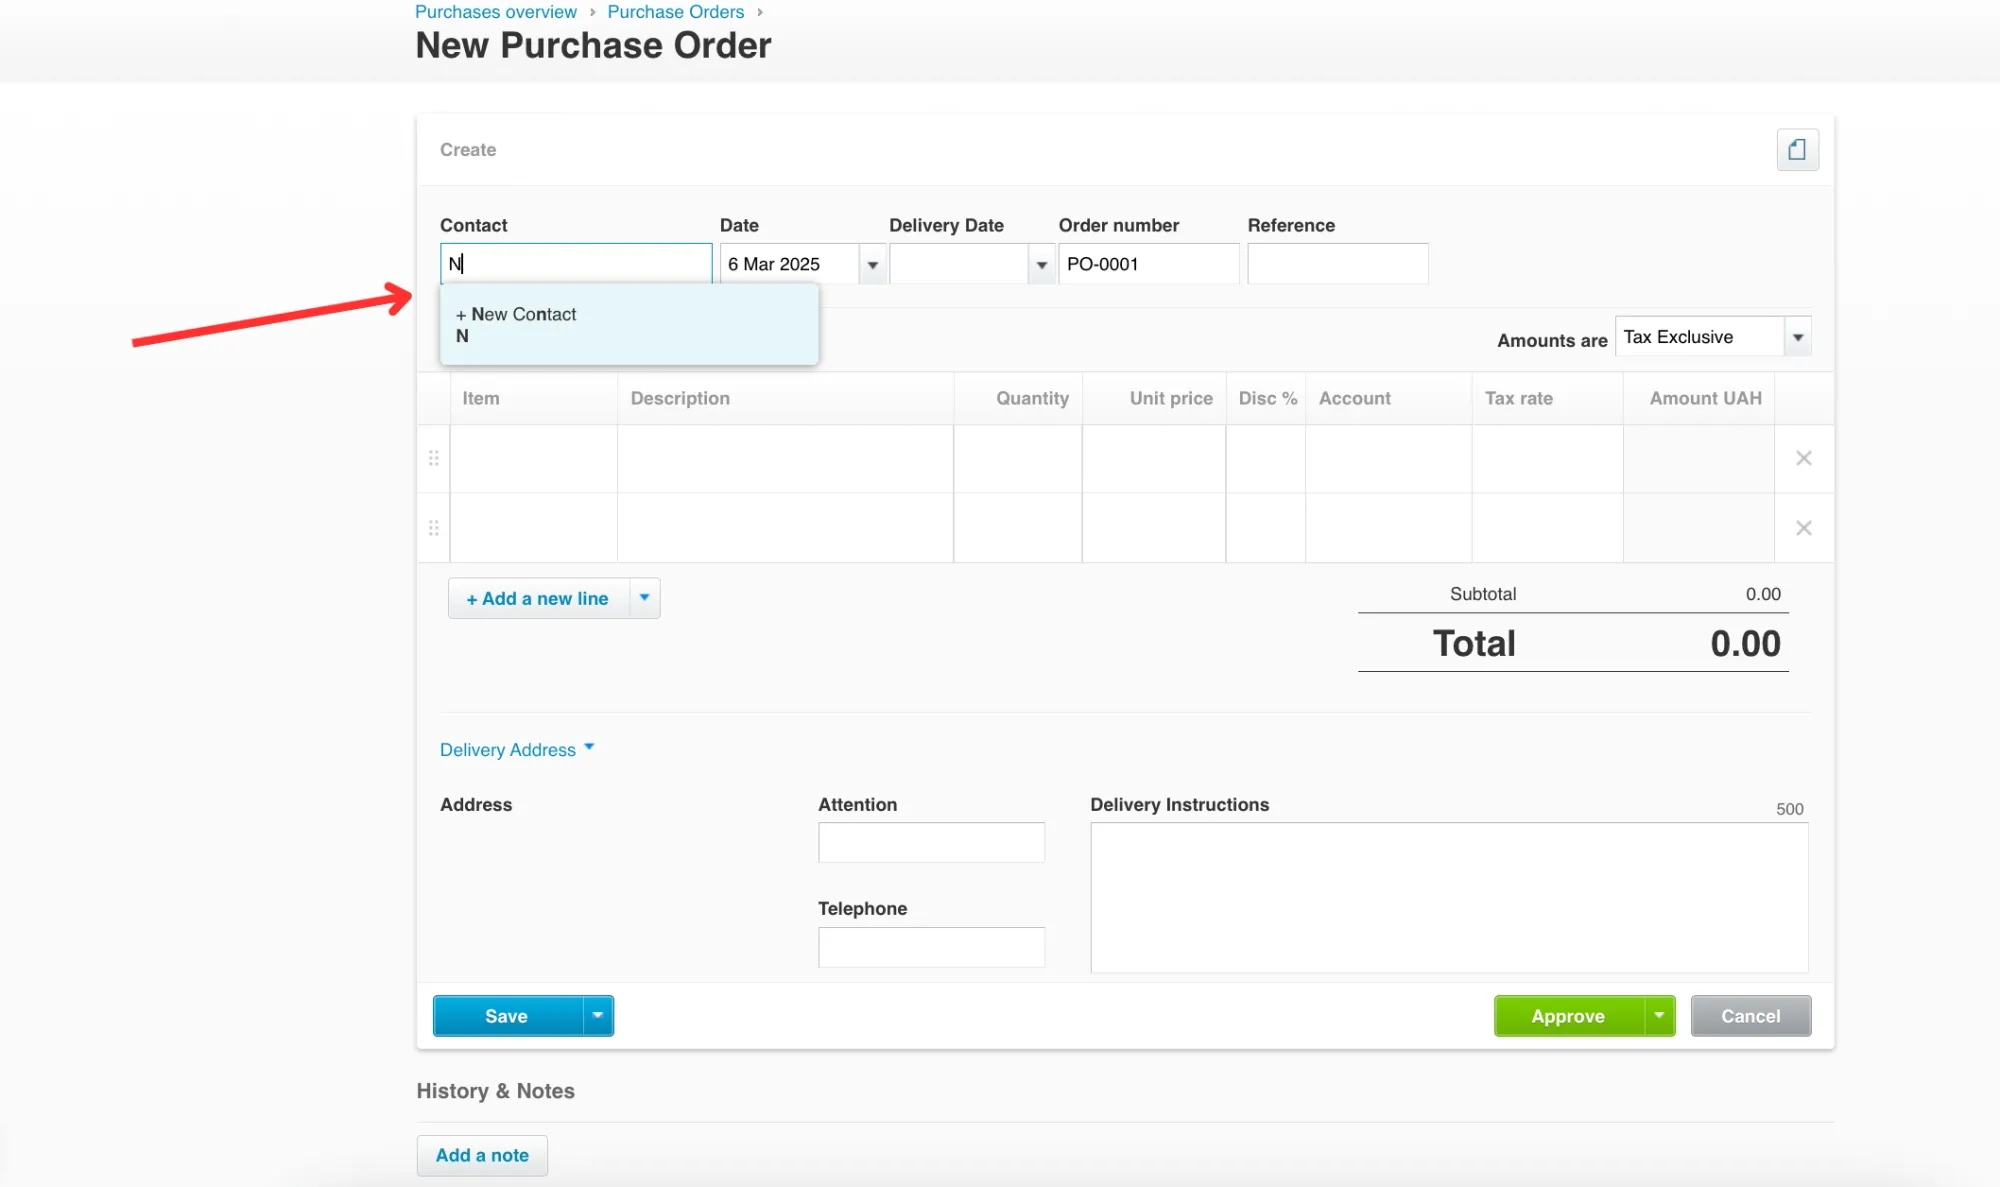
3. Type the correct recipient in the "Contact" field. You can select an existing contact or create a new one (the Xero purchase order system will automatically save it for further usage).
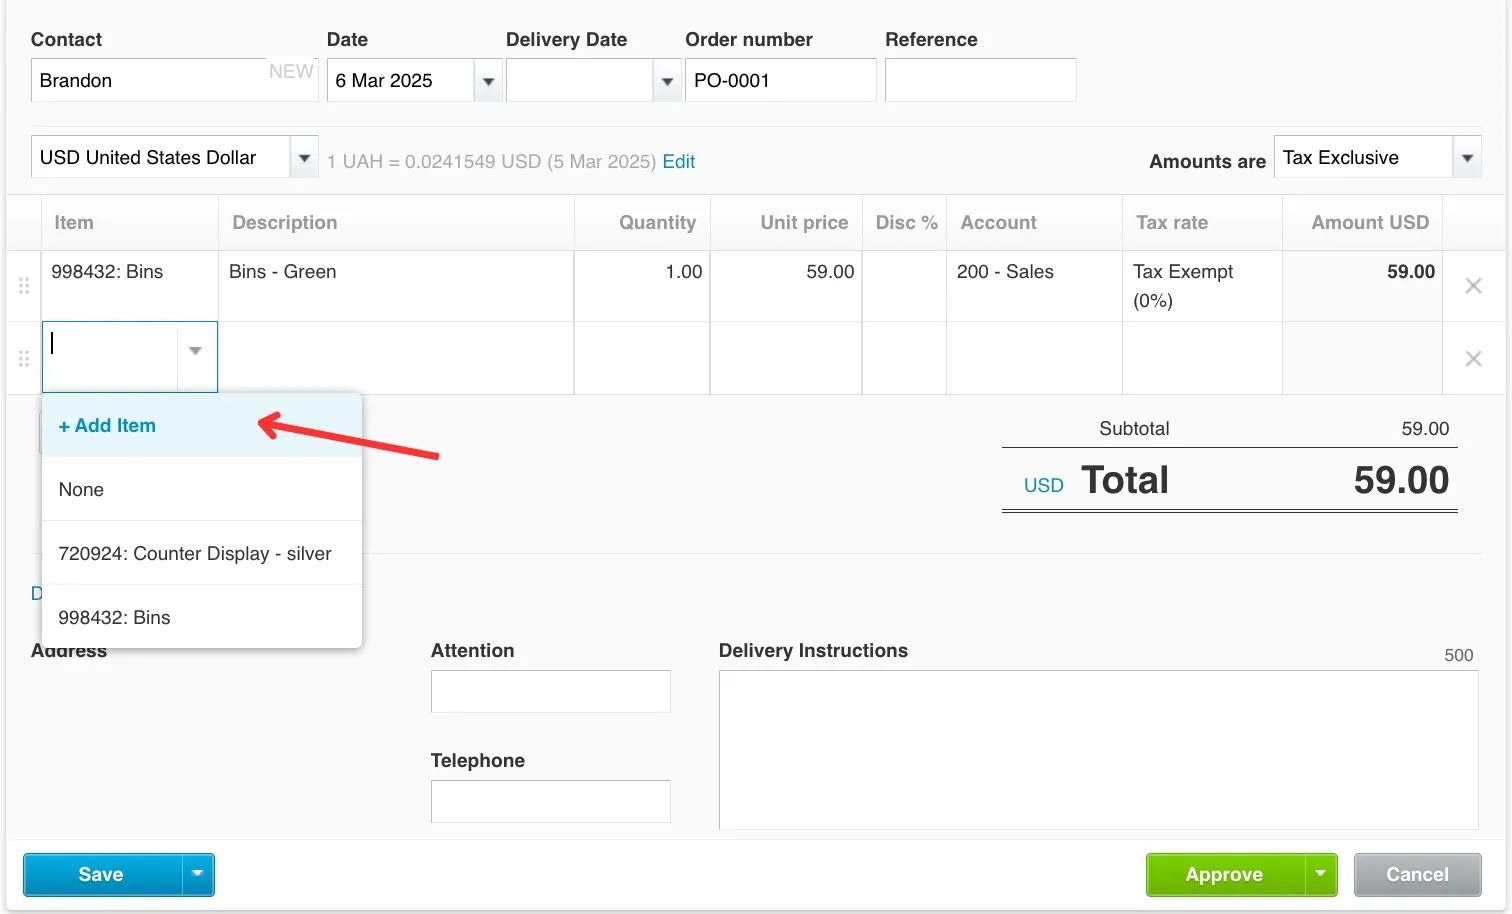
4. Fill in all the required details. Select items from the list or include additional ones. Add as many items and lines as you want.
5. Provide delivery details. While creating purchase orders in Xero, you can select a new address, search for the right one from the contact list, and fill in additional delivery instructions.

Note!
Xero's purchase order system has flexible delivery options. You can select saved addresses with custom labels, enter one-time addresses with specific instructions, or choose customer addresses directly from contacts for drop-shipping. This streamlines procurement while ensuring accurate delivery information across your account without redundant data entry.
6. Attach additional documents or provide specific details in notes.
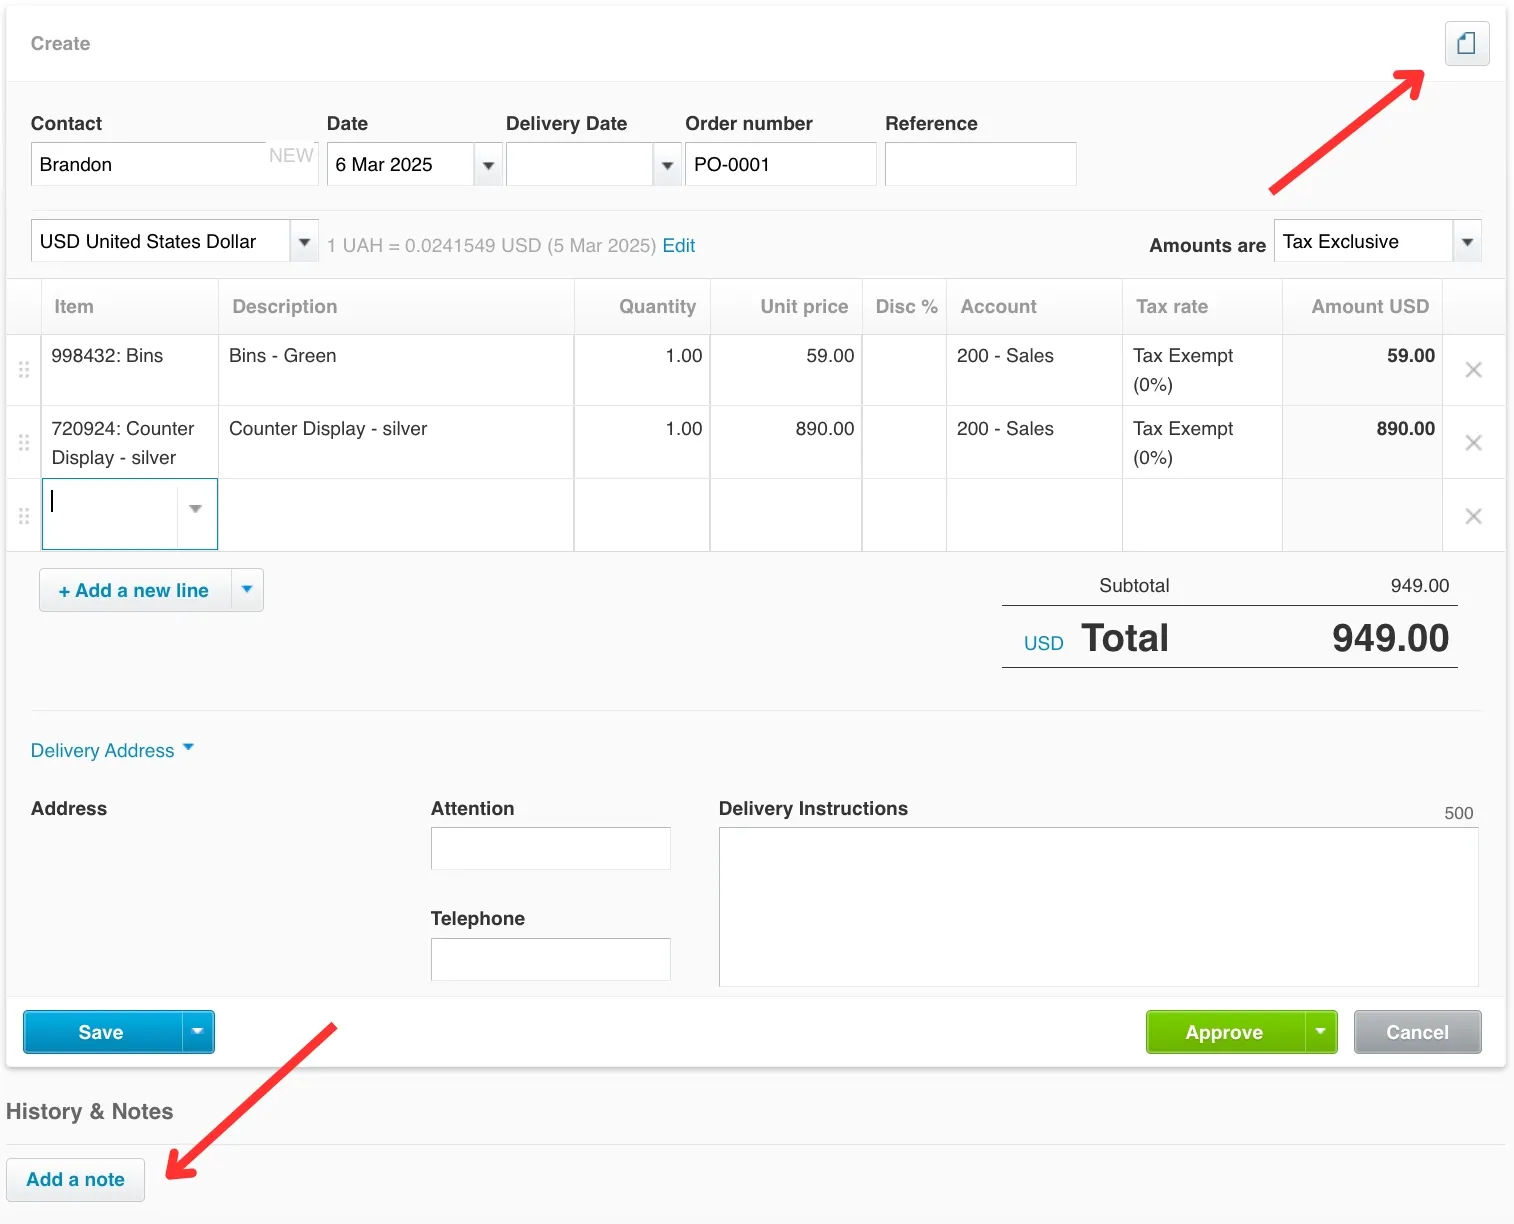
7. Select how you want to save the created invoice.

Note!
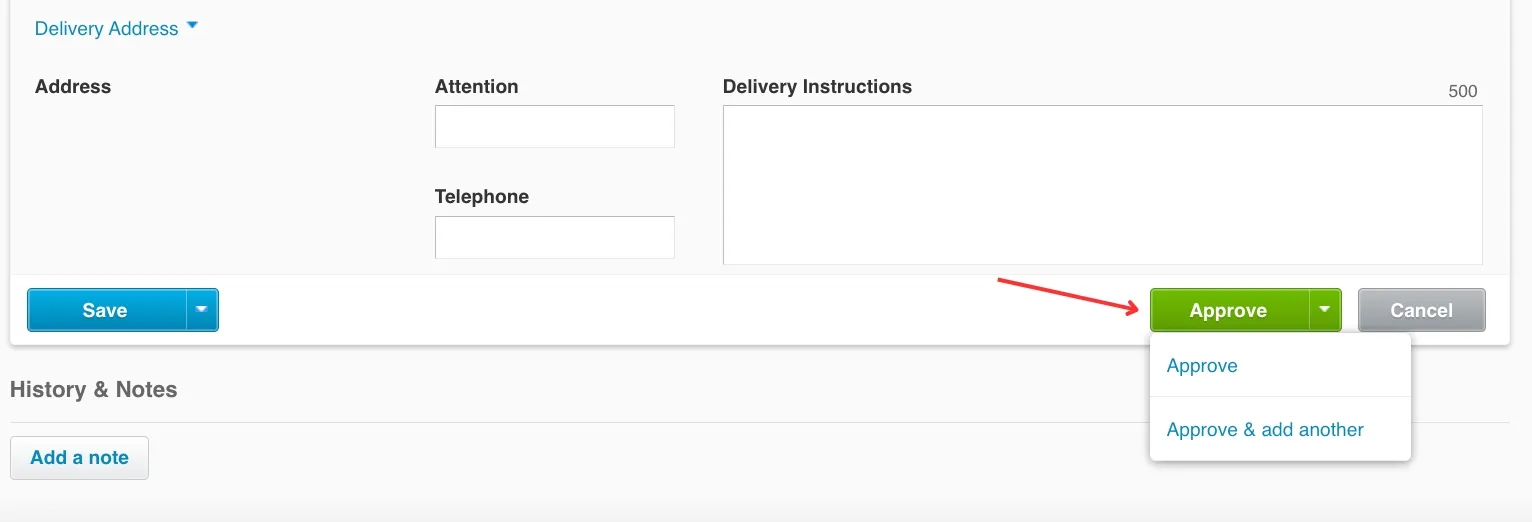
The purchase order is saved as a draft unless you submit it for approval, at which point it appears in the "Awaiting Approval" panel.
You can also approve it immediately without saving. Just click the "Approve" button and select the suitable variant.
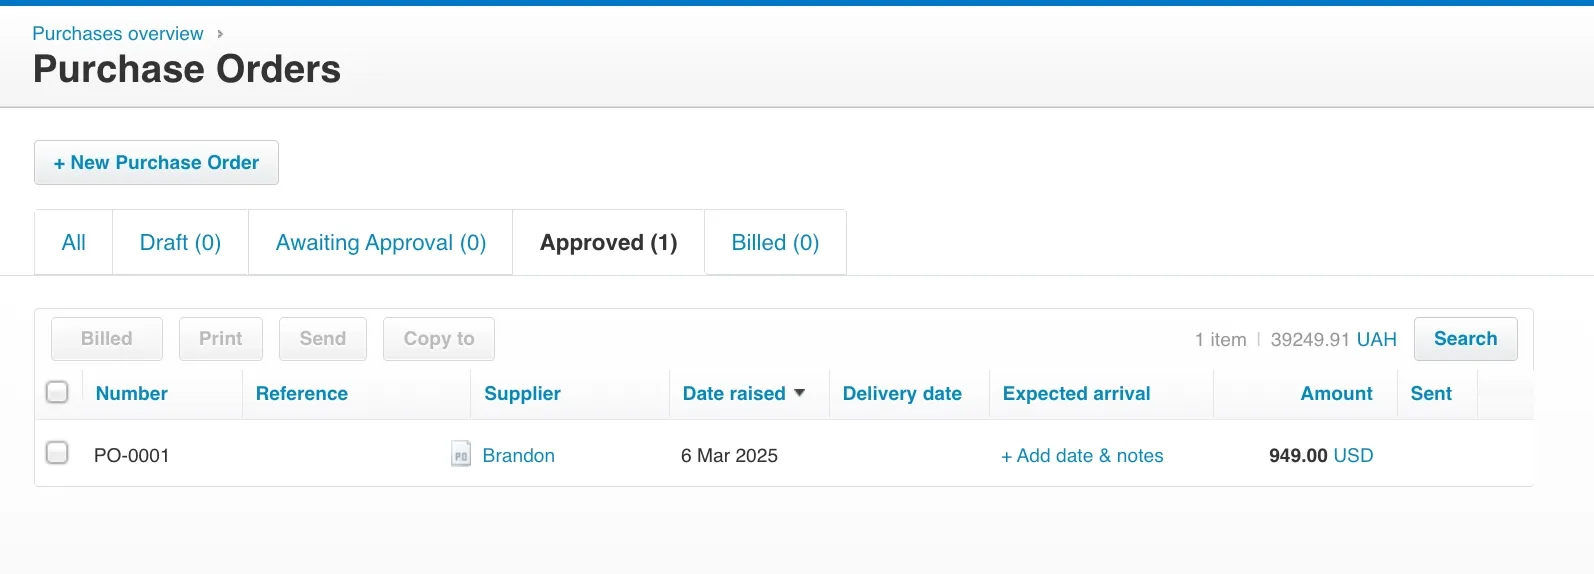
8. To see the full list of your purchase orders, click the "Purchase Orders" button again in the header. You'll always be able to track how many documents you have as drafts and how many need to be approved or billed.
How to Review and Submit Purchase Orders in Xero
Double-check your purchase order for accuracy before submitting it in Xero. Save a draft if you need to edit it later on. Click "Approve" to move it through the approval process or send it straight to your vendor.
Once approved, the purchase order remains active for tracking and updates.
How to Edit or Delete a Xero Purchase Order
First, go to the "Business" tab and select "Purchase Orders". Find the PO you want to change by clicking on its status panel. Click the PO you want to edit and update the required fields. If the fields aren't editable, click "Options," select "Edit," and try again.
Once you've made the changes, save or approve the purchase order. If you need to delete a purchase order, open it, click "Options," and select "Delete".
Note!
You can only delete purchase orders that haven't been converted into bills.
How to Use Purchases Overview in Xero
Besides creating purchase orders, you can track them afterward in the "Purchase Overview" module. In the graph, you'll be able to see all previous or upcoming bills and understand the overall spending picture.
To access this module in Xero, click the "Business" tab and click the "Purchase Overview" module. Blue charts represent unpaid bills with specified due dates. The green ones indicate bills that have already been paid or should have been paid that day.
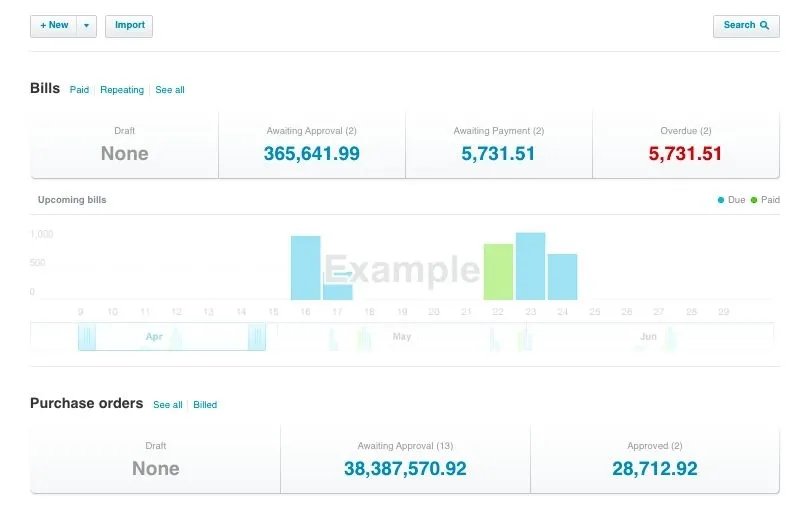
In addition to charts, the "Purchase Overview" module lists your bills and their status.
Benefits of Digitizing Purchase Orders in Xero
Switch from paper to electronic purchase orders in Xero and sync procurement with accounting to gain multiple advantages:
- Streamlined Approval Routing: Orders head straight to managers for fast online approval.
- Fewer Errors: Cutting out manual data entry helps avoid typos and mistakes. This keeps every transaction accurate.
- Better Reporting: All orders are kept digitally to help track spending instantly and guide better financial decisions.
- Better Compliance: Audit trails maintain clear and accurate financial records.
- Simplified Invoice Matching: Xero purchase orders are linked directly to invoices. As a result, companies benefit from simpler processes, reduced admin tasks, and improved cash flow management.
- Improved Vendor Management: Xero can be a central spot for managing all vendor relationships.
- Improved Inventory Tracking: Xero purchase orders let you keep an eye on your stock. This way, you'll always have what you need to meet customer demand.
- Better Cash Flow Management: Xero purchase orders help you track upcoming expenses and manage cash flow better.
- Integration: Xero purchase orders integrate with other features, such as bills and inventory management, and platforms for procurement, like Precoro.
Limitations of Xero's Purchase Order System
- Lacks advanced approval workflows (requires third-party integrations).
- Cannot automate three-way matching (PO → Invoice → Payment).
- No inventory commitment tracking (POs do not link directly to inventory levels).
Precoro or similar tools can integrate with Xero for automated approval flows, spend analysis, and real-time supplier tracking for businesses needing advanced procurement controls.
Direct Precoro Integration with Xero
Set up an automated two-way sync with no sweat. You don't have to be tech-savvy or boast coding skills to integrate Precoro with Xero. Here's what you'll get:
Intuitive Connection and Easy Adoption
Setting up Precoro with Xero is quick. Connect with a click, choose what to import, and let the system do the rest. Data mapping and training support are available as needed.
Synced POs, Invoices, Suppliers, and More
Whether you create, approve, revise, or cancel an invoice or purchase order in Precoro, the changes are automatically reflected in Xero. Tracking categories, items, accounts, taxes, assets, supplier contacts, and inventory are updated accordingly.
Fully Configurable Documents
Import selected documents into Precoro and customize them with notes, attachments, and specific settings. Precoro supports unlimited item custom fields, ensuring seamless data exchange.
High-Level Security
Create approval workflows, set employee access levels, and implement secure logins. Precoro offers full support for SSO and two-factor authentication.
This integration syncs your procurement and finance operations, eliminates manual data entry, and optimizes your purchasing workflow. These features enhance security and streamline user management while creating new Xero purchase orders.
With the integration, you can import essential data such as charts of accounts, items, tax rates, etc. Besides, you can create purchase orders or invoices in Precoro and immediately get them in your Xero account (all actions related to these documents will be visible here).

Frequently Asked Questions
A purchase order (PO) in Xero refers to a formal document that a buyer sends to a supplier to request goods or services. It lists item details like descriptions, quantities, prices, and delivery instructions. Xero helps make accounting simpler. It sorts requests, tracks orders, and links them to bills and invoices, which results in improved financial management.
Once approved, the PO status is updated to "Approved" and sent to the supplier. You can then track the order in Xero's Purchase Overview and match it with supplier invoices later.
If discrepancies occur (mismatched quantities or pricing errors), open the PO in draft mode, correct the information, and resubmit it for approval. Regularly review orders before sending them to minimize such issues.
No, each purchase order can have just one supplier to keep the procurement process clear and accurate.
Yes, Xero supports reusable templates for creating recurring or similar purchase orders. You can also copy previous POs to save time when reordering items from suppliers.
From Complexity to Clarity with Xero's Purchase Orders
In a nutshell, using Xero purchase orders goes beyond documenting transactions.The platform helps select suppliers, add item details, and set delivery instructions in just a few steps. Customizable templates help your brand shine in every order.
Beyond purchase order management, Xero helps businesses handle/manage bills, invoices, and inventory. Thus, it cuts down on duplicate data entry and keeps records current. Whether for one-time purchases or ongoing procurement, Xero provides the tools to manage it all.
Xero helps build stronger supplier relationships, keep financial records accurate, and make operations smoother. Integrating it with Precoro takes this further by reducing manual work by up to 80%, improving spend visibility, and adding security features like SSO and two-factor authentication.
Whether you're managing small or large-scale operations, you can always count on the connection of Precoro and Xero to simplify your purchasing and accounting processes.


