How to Create an Invoice in QuickBooks Online
In this short guide, we’ll go step-by-step over the process of creating an Invoice in QuickBooks Online.
QBO is an online accounting tool for small and middle businesses. It’s convenient and intuitive to use, and SMEs choose it to automate accounting processes and control company spending better.
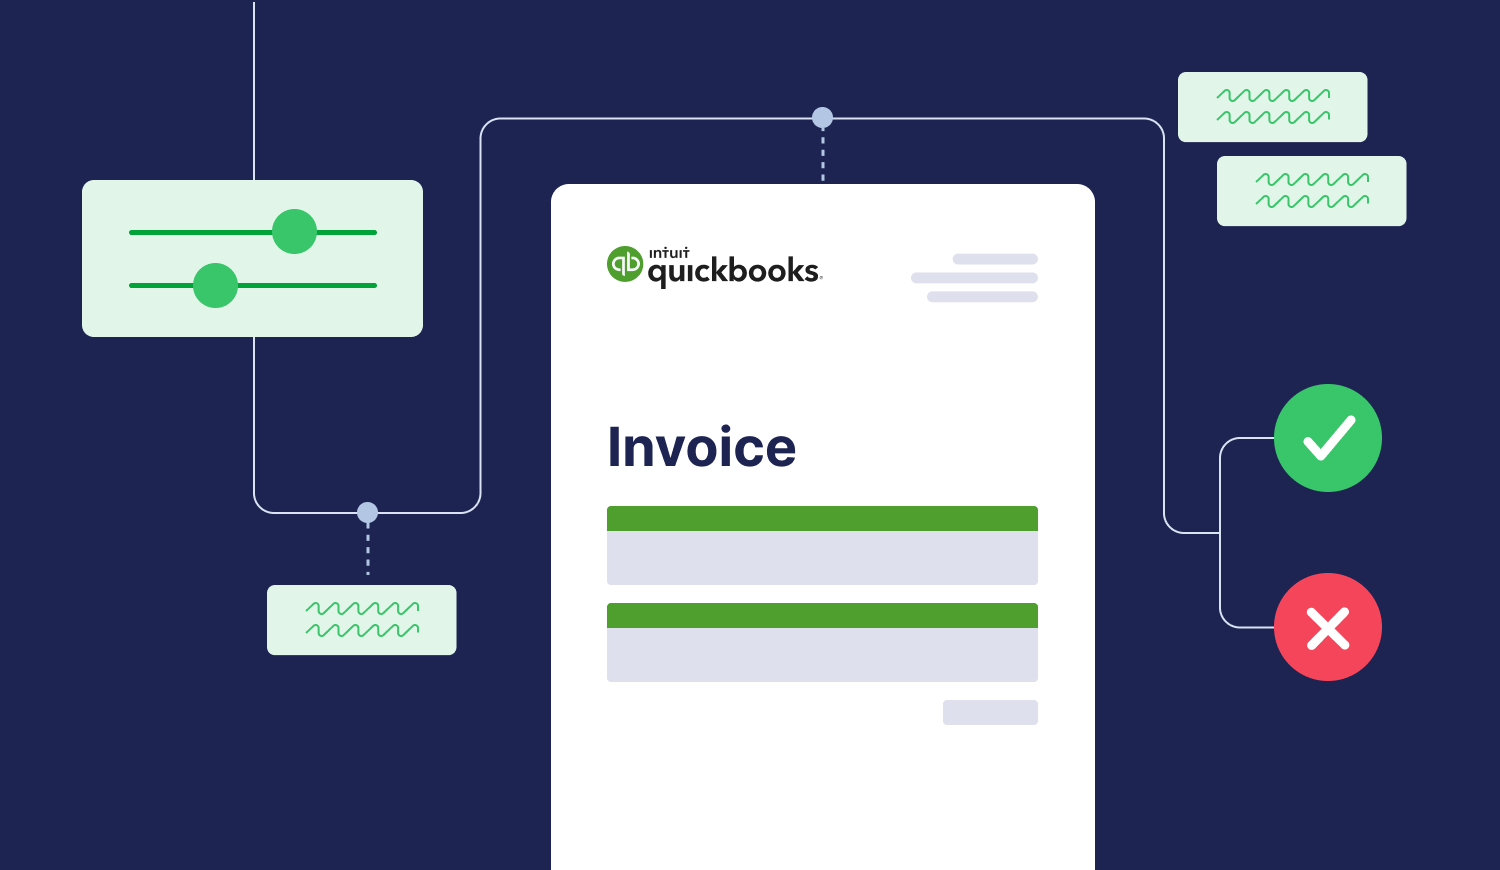
We at Precoro have introduced direct integration with QuickBooks Online. It allows businesses to reduce manual entries of Invoices and eliminate duplicated efforts, speed up Invoice processing, and minimize human errors.
In a series of integration tips, we share brief “how to” manuals on utilizing key features of QuickBooks Online.
Issuing Invoice in QBO
Let’s see how to create an Invoice in QuickBooks Online.
General Info
Creating an Invoice in QuickBooks Online is intuitive and only takes a few steps.
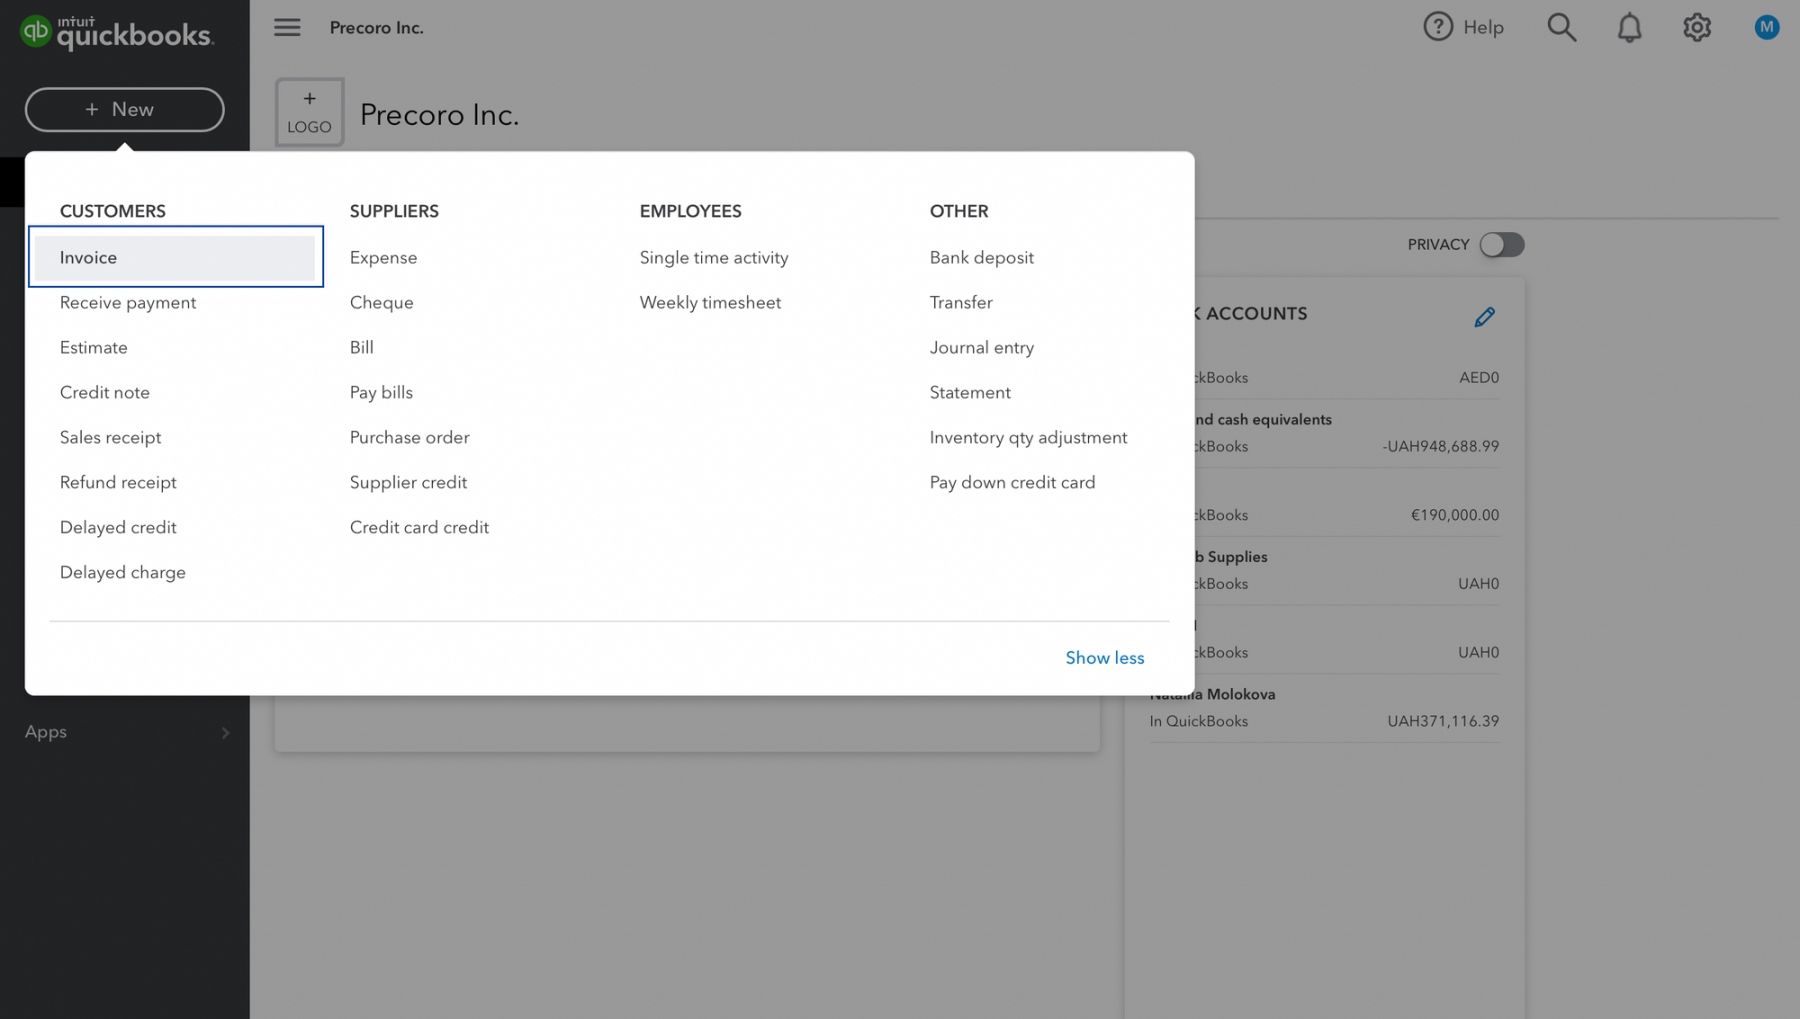
- Click the button “+New”, go to the column “Customers”, and select “Invoice”.
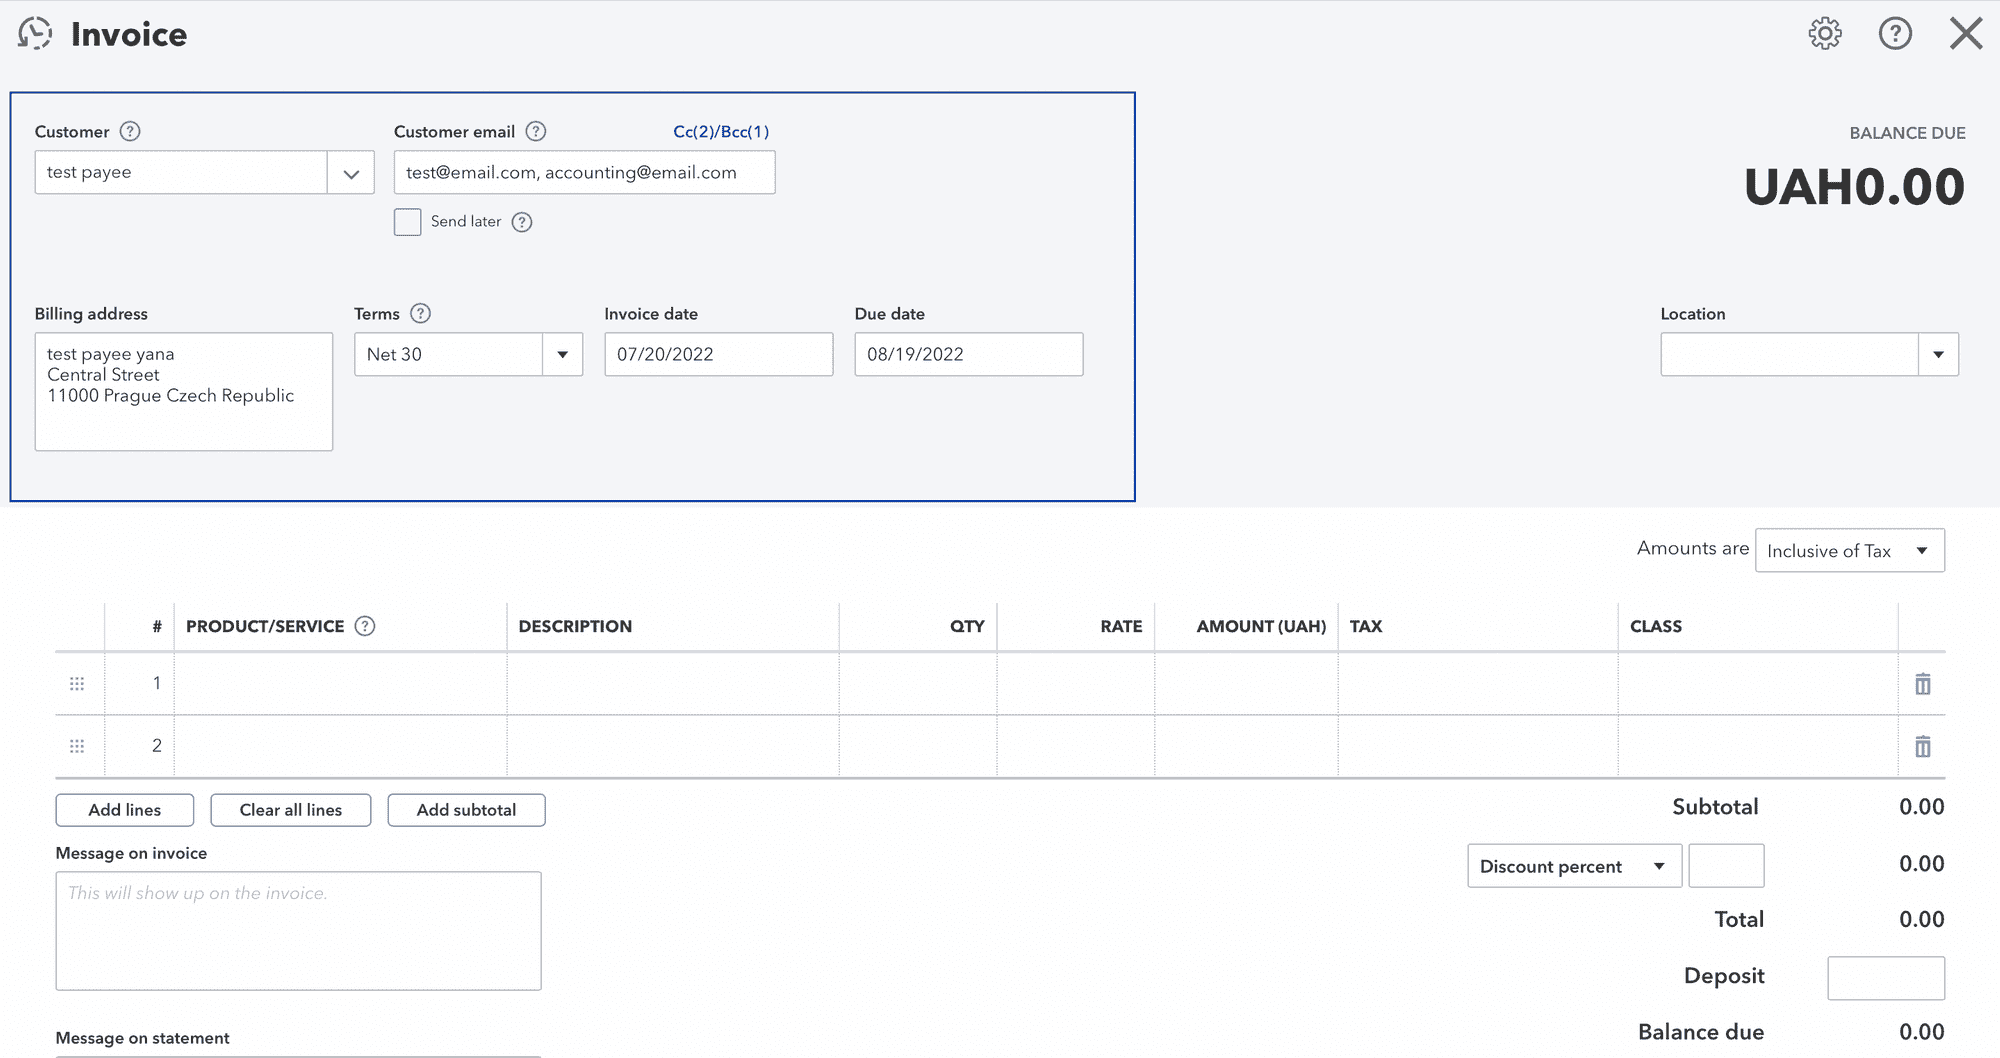
- Select a Customer to issue the invoice for. You can also create a new Customer directly from the Invoice by selecting “Add new” in the Customer selection field.
- Upon selecting the Customer, the system will automatically import the e-mail (or e-mails) and billing address from the Customer settings. If this information hasn’t been added in the Customer settings, you can enter it manually in the Invoice.
- You can enter several e-mail addresses by separating them with commas. It’s also possible to add Cc and Bcc e-mails.
- Select Terms of payment, Invoice Issue, and Due Dates.
Additional Fields
You can also include optional fields, such as:
- Shipping
- Total discount
- Deposit
- Custom transaction numbers
For this, go to the Setting icon in the top-right corner.
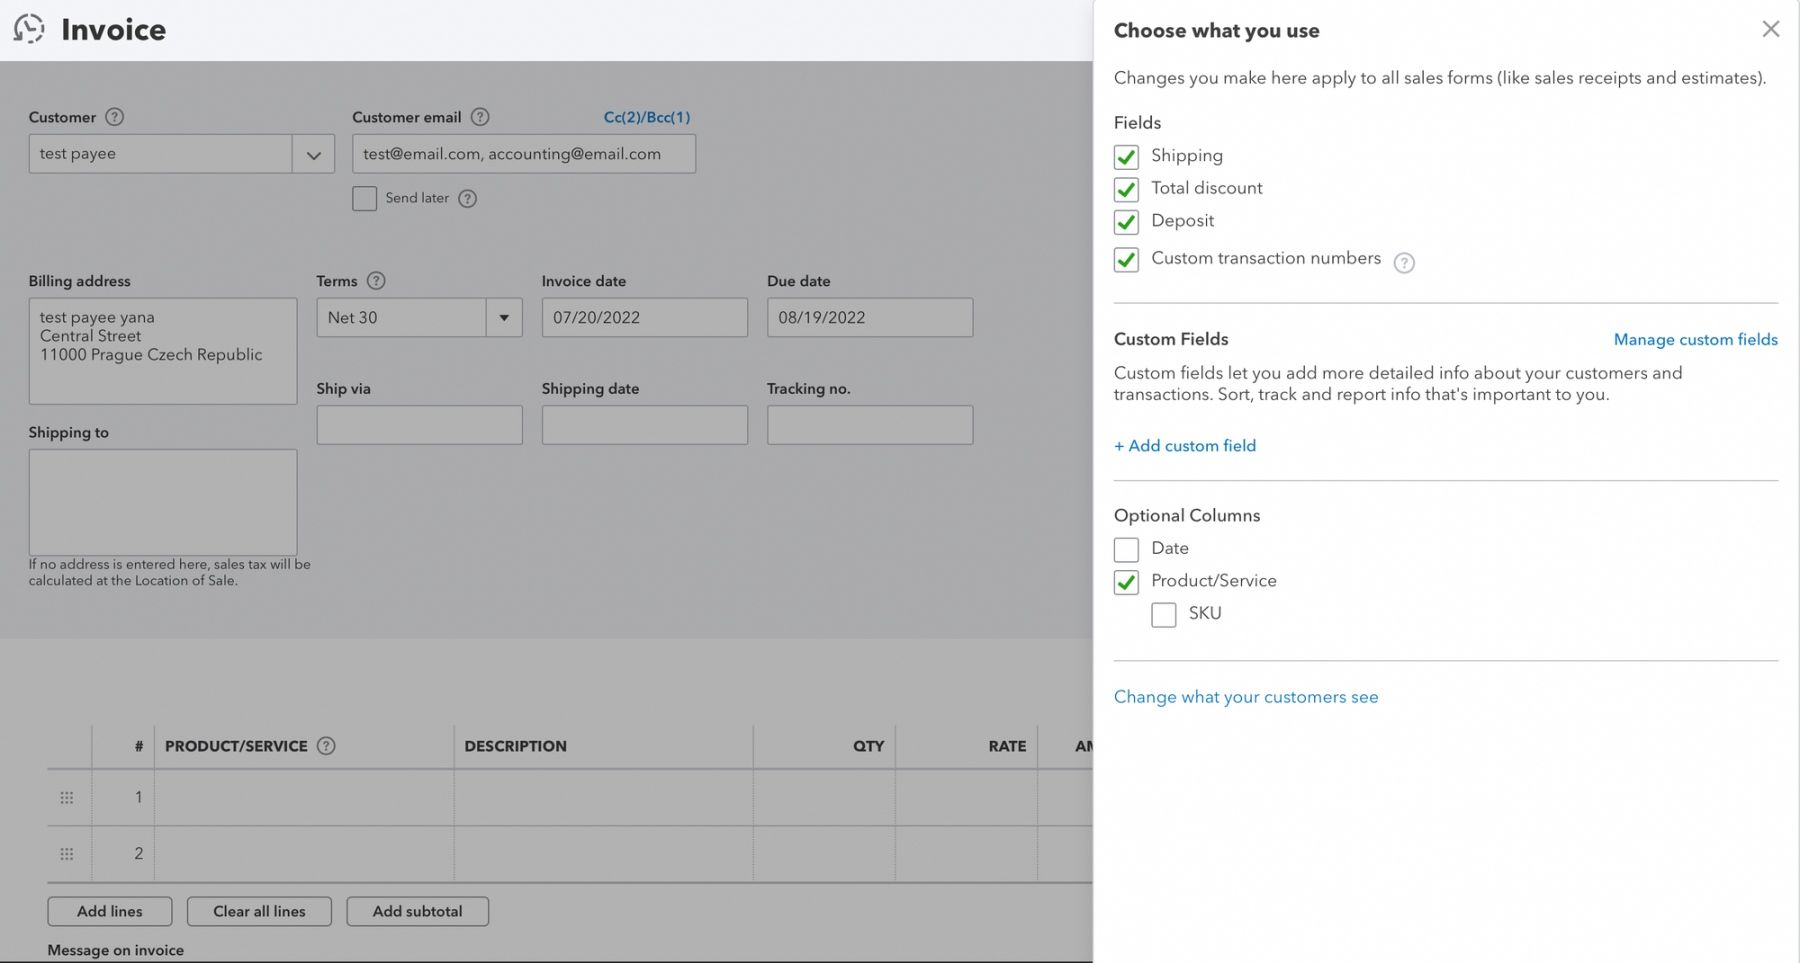
Upon selecting “Shipping”, you’ll see the Shipping address imported from the Customer’s settings, or you can enter it manually. Several fields with shipment information will also appear, such as “Ship via”, “Shipping date”, and “Tracking No”.
By checking “Custom transaction numbers”, you’ll be able to enter a custom Invoice number. Otherwise, the system will assign a number automatically.
“Total discount” and “Deposit”, if included, can be entered and calculated before the Total.
List of Items
Fill in the list of Products sold or Services provided by the Customer. It’s possible to select existing ones from the Products and Services directory or add new ones directly from the Invoice.
Please note, to save the Invoice, it’s necessary to add at least one Product or Service with a tax rate.
Adding or removing some fields in the Items List is also possible.
Date, Product/Service selection, and SKU can be included or removed. However, it’s important to note that excluding Product/Service selection will turn off the use of purchase orders in QuickBooks Online and several other functions. That will limit functionality substantially.
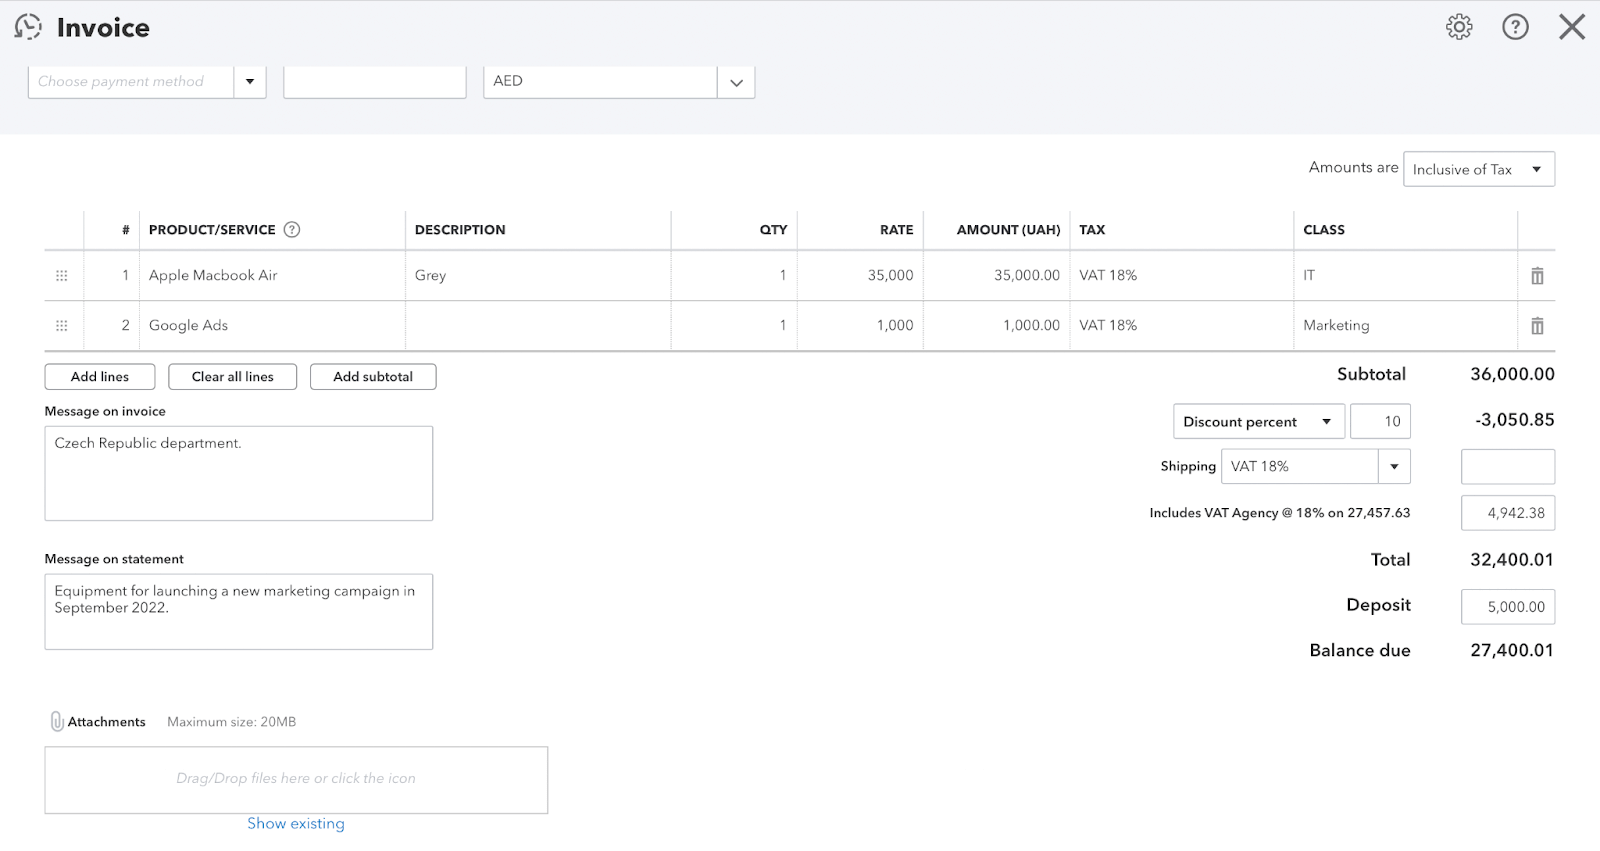
Descriptions
You can also add a message to be displayed on the Invoice and another one for the Customers Statement. It’s also possible to include up to 20Mb (in total) of attachments.
Save
There are several options for saving the Invoice:
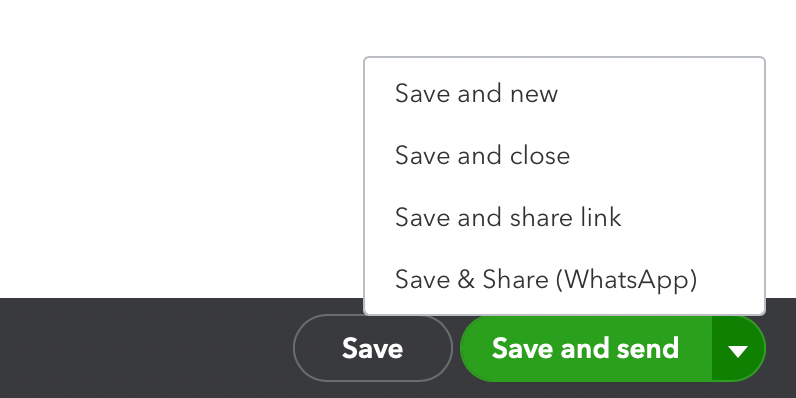
- Save. You can save the Invoice and return to it later to continue editing.
- Save and new. Save the current Invoice and create a new one right away.
- Save and close. Save the Invoice and return to the screen you were working on before.
- Save and share the link. After saving the Invoice, the System will generate a link to share with the Customer to download, print, and pay the Invoice.
- Save and share (WhatsApp). After saving the Invoice, the system will offer to send it to the WhatsApp account registered for the Customer’s e-mail. Or to any other e-mail entered in the pop-up window.
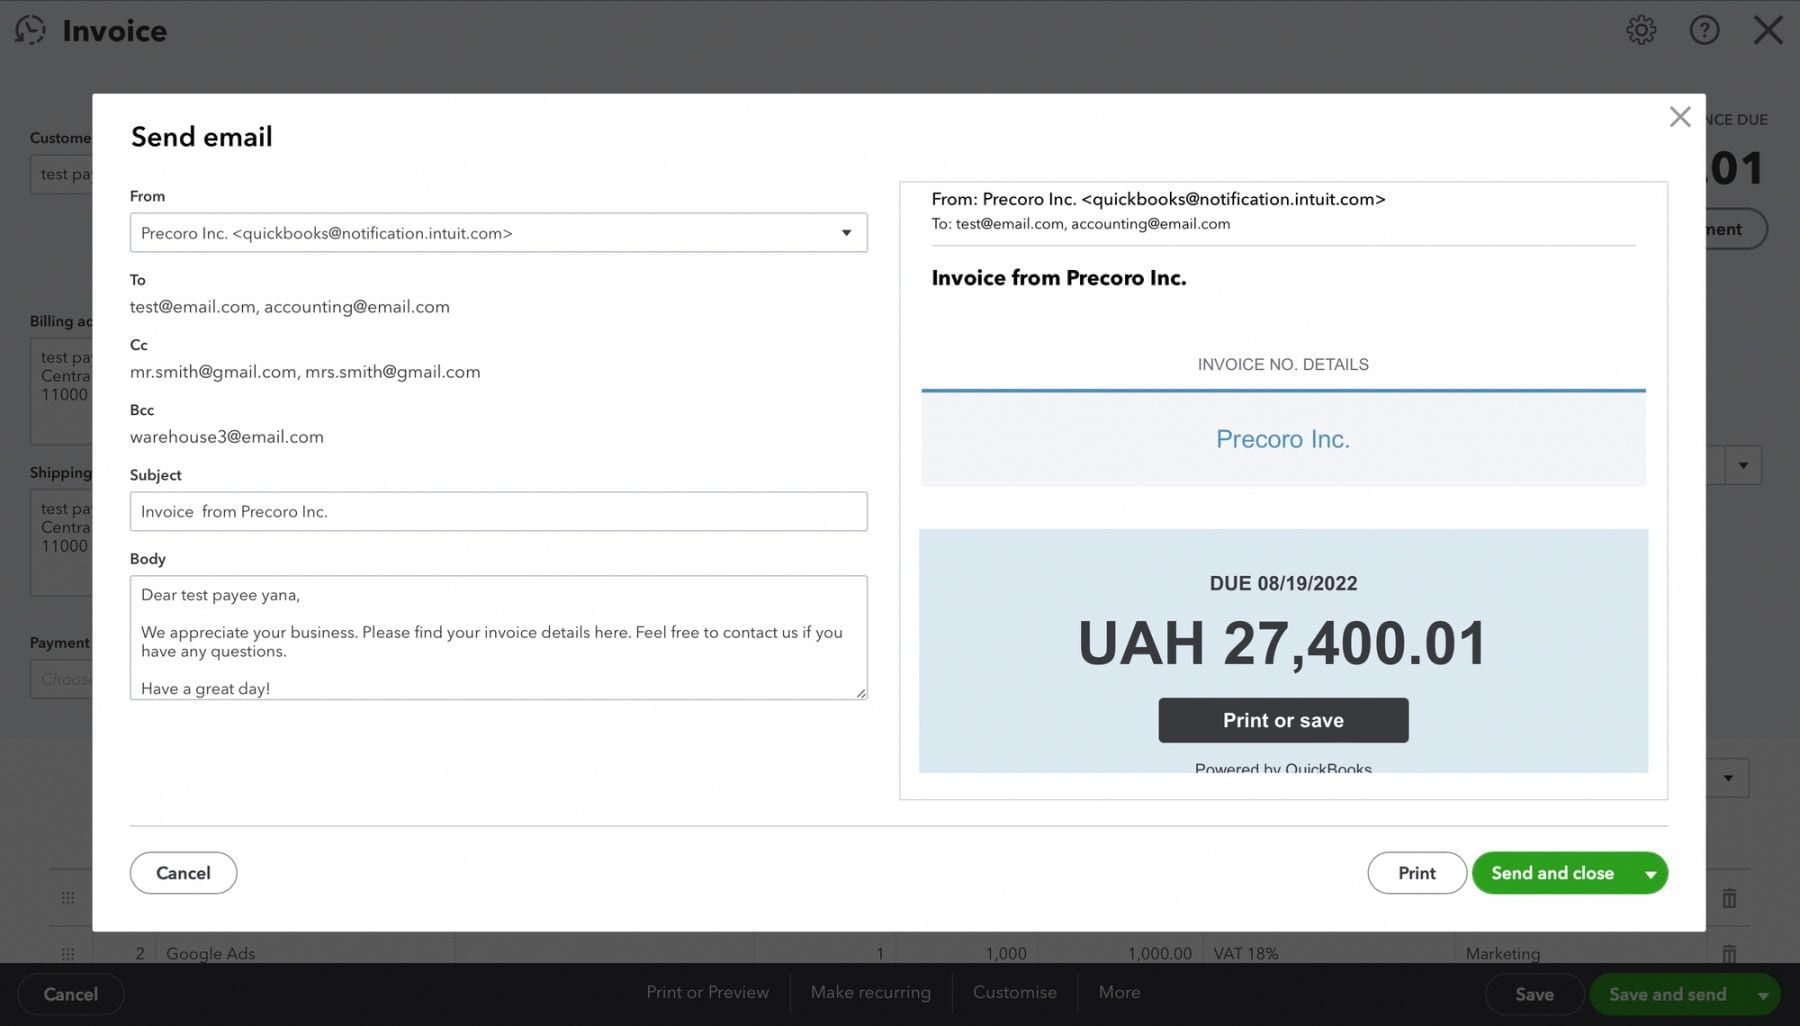
- Save and send. By selecting this option, you’ll initiate a process of sending the e-mail to the Customer with the Invoice included as an attachment. In a pop-up window that appears upon selecting this option, you’ll be able to edit the From, Subject, and Body information and then print and send the e-mail.
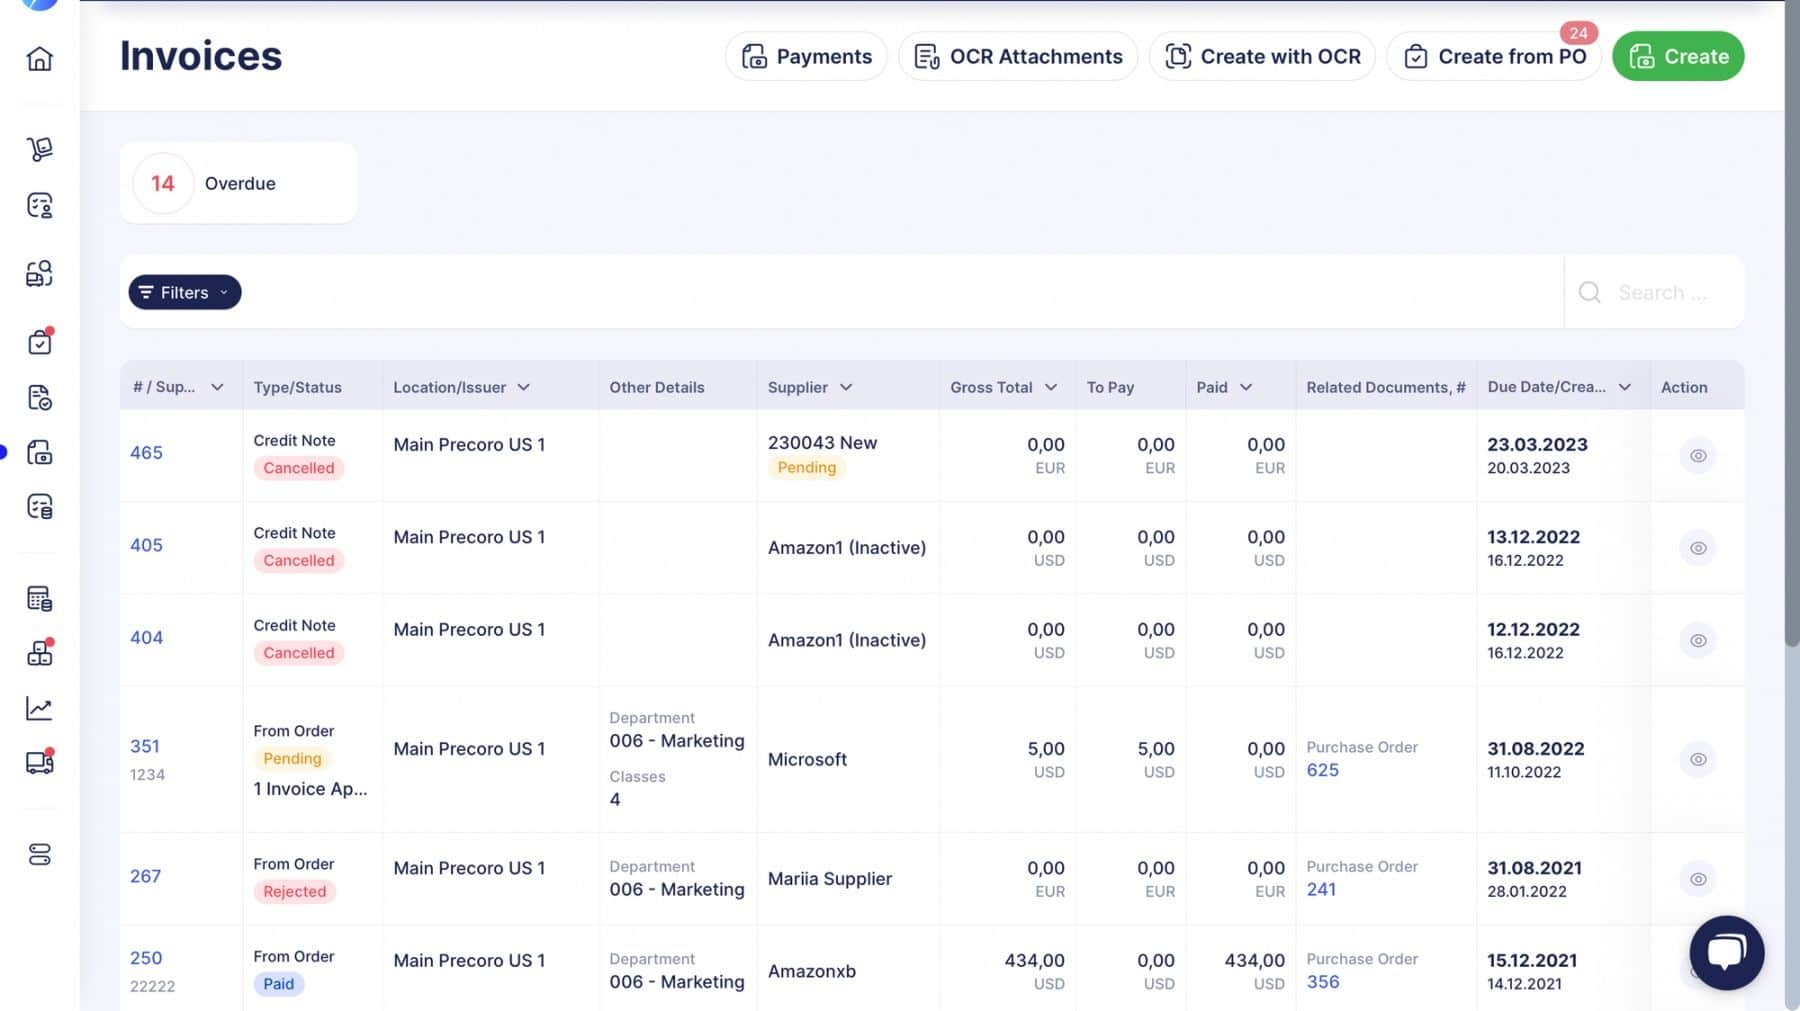
Tracking Invoices in Precoro
In Precoro, it’s possible to create an Invoice manually or generate it from the Purchase Order. It’s possible to create a single Invoice or set a Recurring Invoice for repeated purchases.
The Invoice then goes through several stages of processing, which can include:
- Draft
- Pending
- Pending Confirmation
- Approved
- Rejected
- Paid/Partly paid
- Canceled
Invoices are easily tracked on the overview page.
Utilizing Integration with QuickBooks Online
With QuickBooks Online and Precoro integration, companies can automatize and speed up creating and evidencing Invoices and Bills, avoid unnecessary workload and minimize errors
With settings and items synced automatically, accounting for company purchases becomes smooth and easy.
Invoices and Bills
The term “Invoice” bears different meanings in accounting and procurement.
In terms of QBO accounting software, an “Invoice” is an Outgoing Invoice – a legal document requesting a payment from the Customer. An Incoming Invoice, on the other hand, contains details of payment to be made to the product or service provider. It is registered as a “Bill” in QBO accounting.
In procurement software, such as Precoro, the term “Invoice” is used for the Incoming Invoice, specifying the purchase details. It’s a document identifying the amount owed to the Supplier or Vendor.
Therefore, an Invoice created in Precoro immediately appears as a Bill on the list of expenses in QBO. When the bill is marked as paid in QBO, the Invoice’s status in Precoro is automatically updated.
Integrating QuickBooks Online with Precoro is a way to bring procurement and accounting together. With every invoice and bill recorded, tracked, and accounted for, companies avoid maverick spending and financial losses due to errors, miscalculations, and delays in payments.


