9 min read
Product Update, July 2023
Dive into Precoro's sizzling update: Negative item values, HiBob integration, RFP revision tracking, and more.
Customizable contract notifications
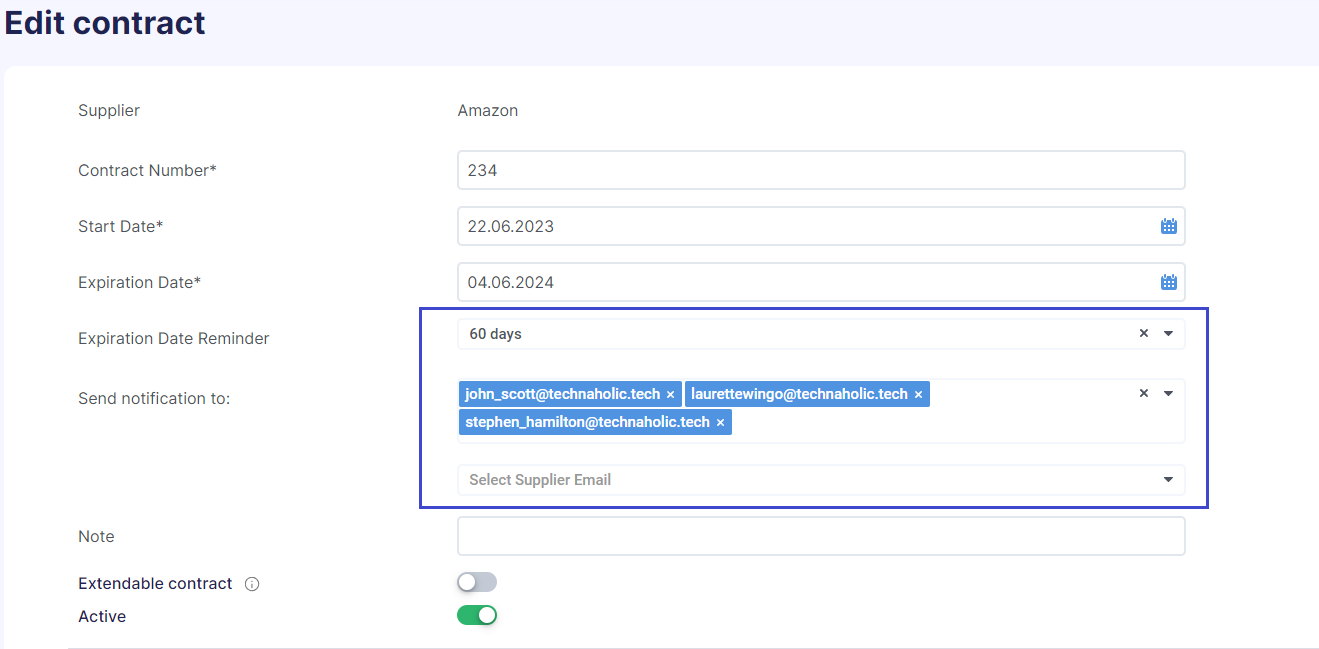
Take full control of your contract notifications with our latest customization options. Here’s how you can now personalize your contract-related emails:
- Set an expiration date reminder: Select the number of days before the contract's end date to receive a timely email notification.
- Customize recipients: Personalize who receives the notification by choosing from various options in the Send notification to field. You can choose the supplier, a responsible person for a contract within your company, or both.
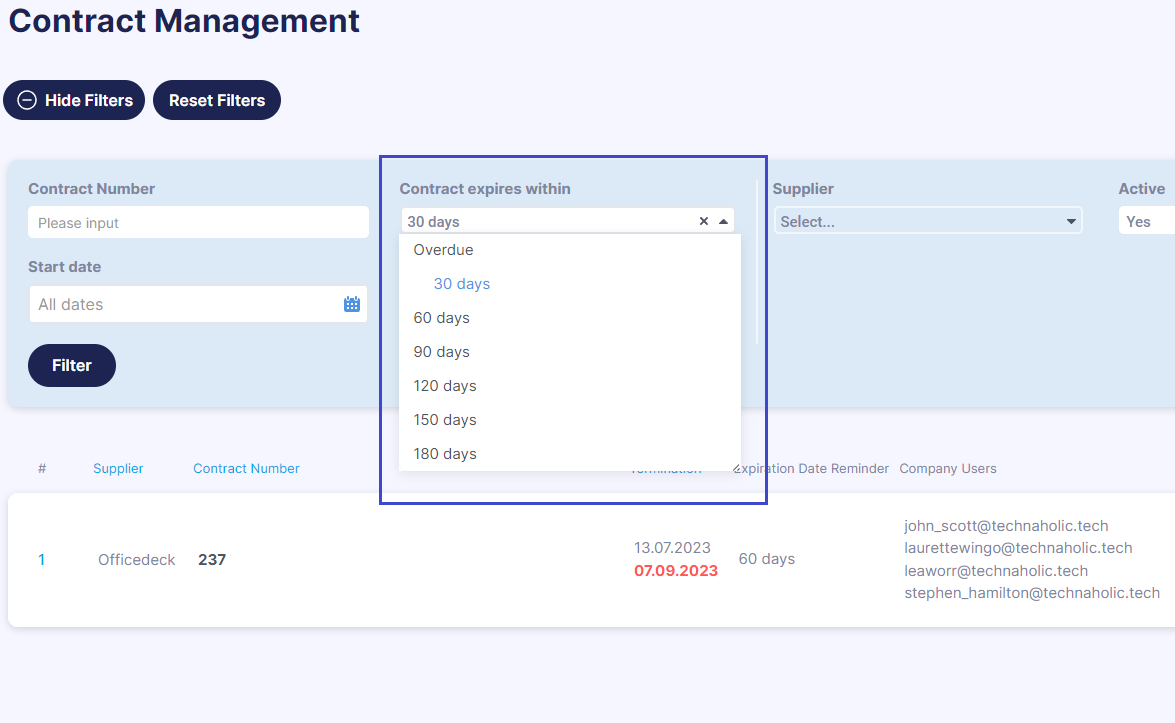
We’ve also added the new Contract expires within filter on the Contract Management page. It will help you quickly find the overdue or soon-to-be expired contracts and take the appropriate measures.
Custom reports for contracts
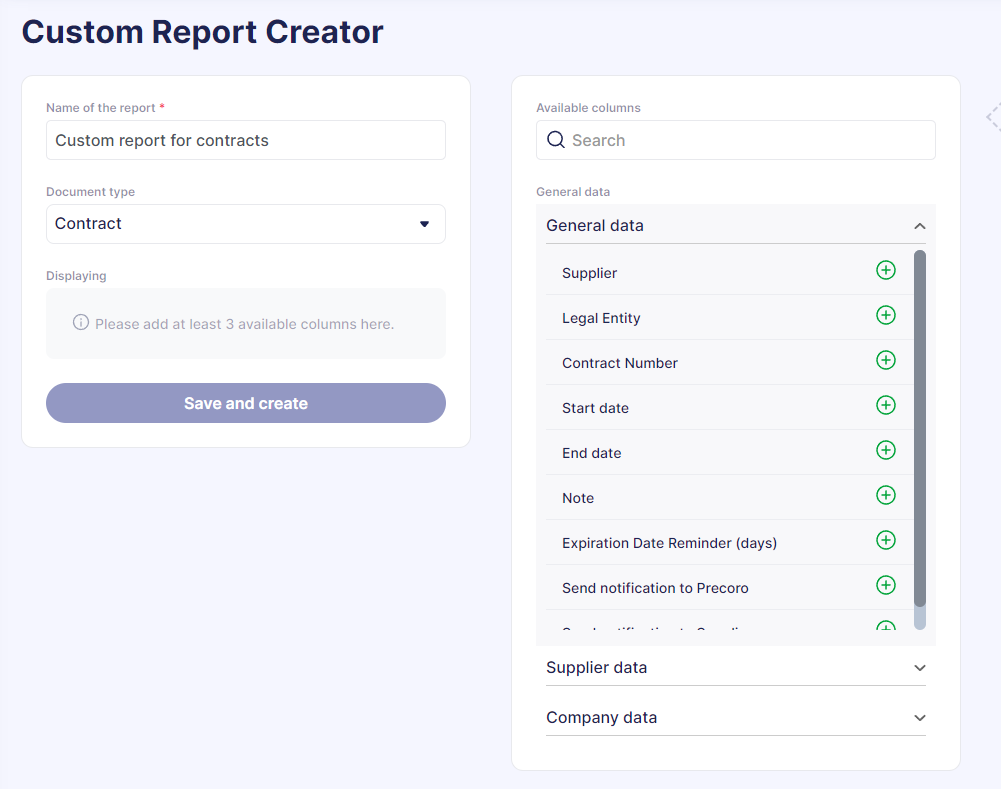
Last month, we introduced the ability to create custom reports for contracts. Within the General Data section, you can include a range of options in your report, such as:
- Supplier
- Legal Entity
- Contract Number
- Start Date
- Expiration Date
- Note
- Expiration Date Reminder
- Send notification to Precoro
- Send a notification to Supplier
📖 To learn more about creating and using custom reports in Precoro, check out this helpful article.
The ability to import warehouses in bulk
You can now swiftly import numerous warehouses at once using a single file, saving the time and effort of manually creating each entry.
To do so, please follow these steps:
- Go to Configurations → Inventory;
- Click the Import Warehouses button on the right action panel;
- Follow the instructions on the page.
For more information on how to import warehouses in bulk, follow the link to our Knowledge Base.
Revision History in requests for proposals
We have added a Revision History function for requests for proposals (RFPs) to help you easily track and review any changes made to proposals over time.
To see the revision history for RFPs, follow these steps:
- Go to the Requests for Proposals page and open the document in which you want to track revisions;
- Press the Revision History button in the right action panel;
- Mark two revisions and press the Compare Revisions button at the bottom.
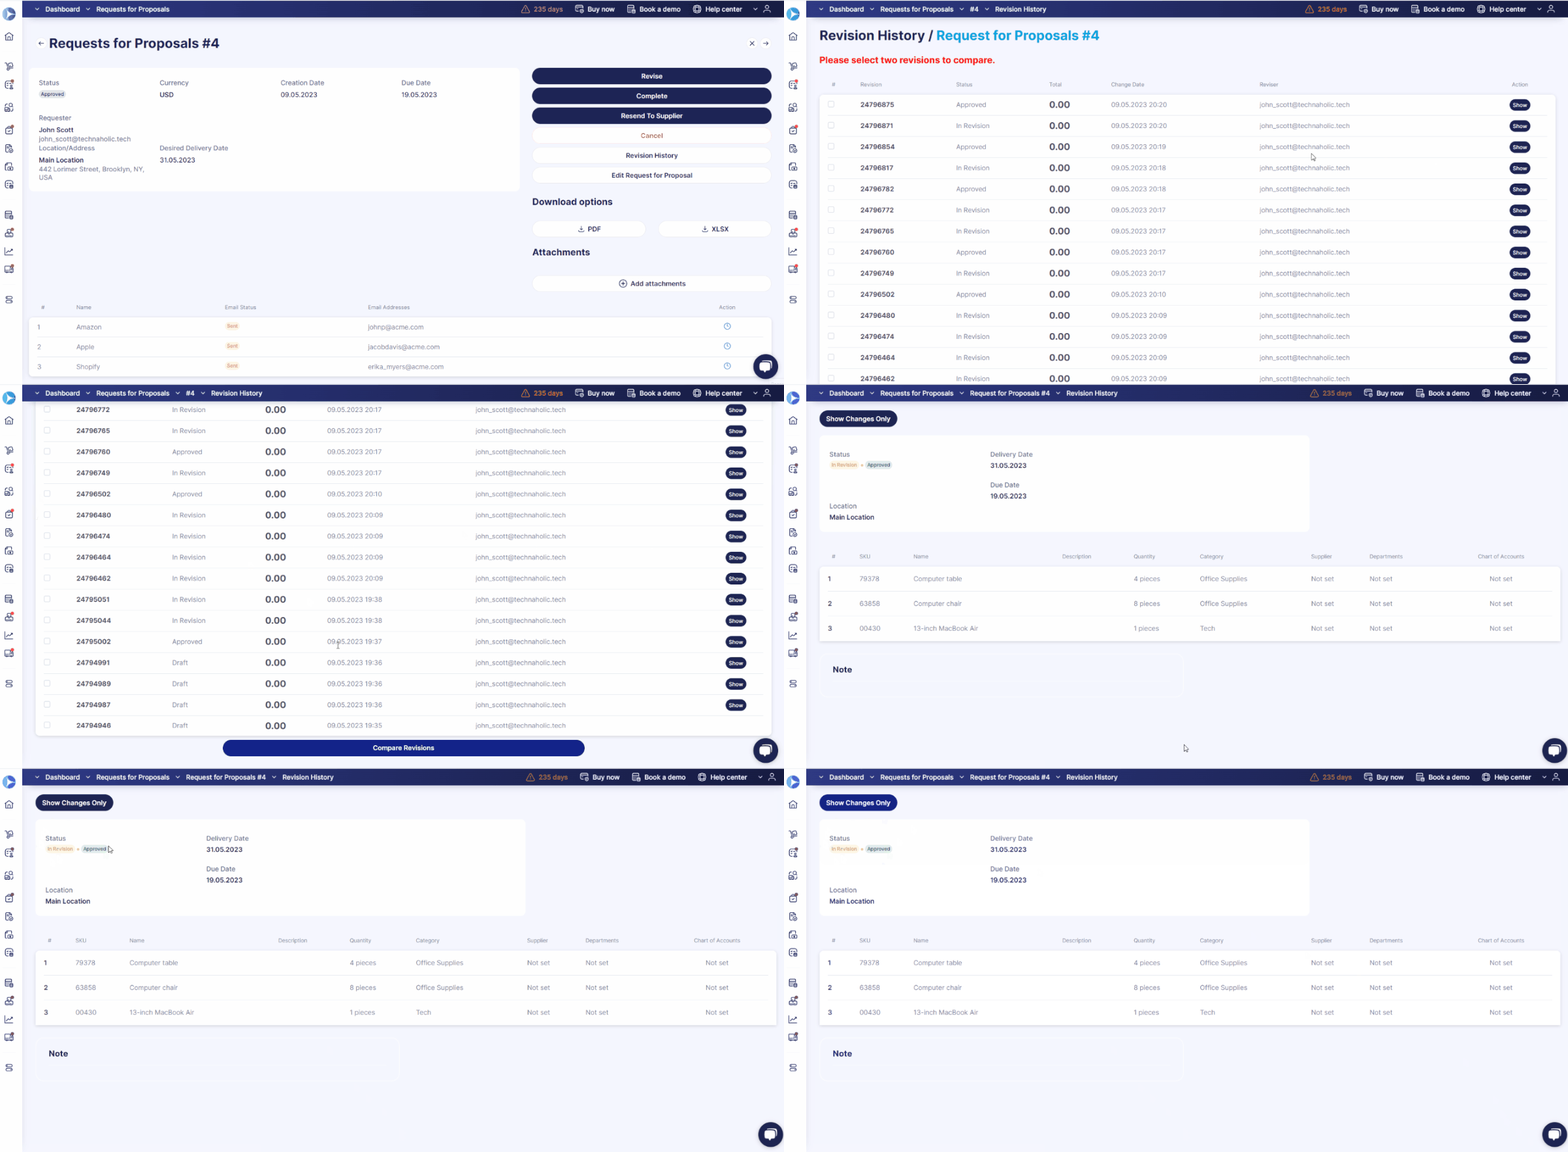
📖 Follow this link to our Knowledge Base for more instructions on using Revision History.
New in item management
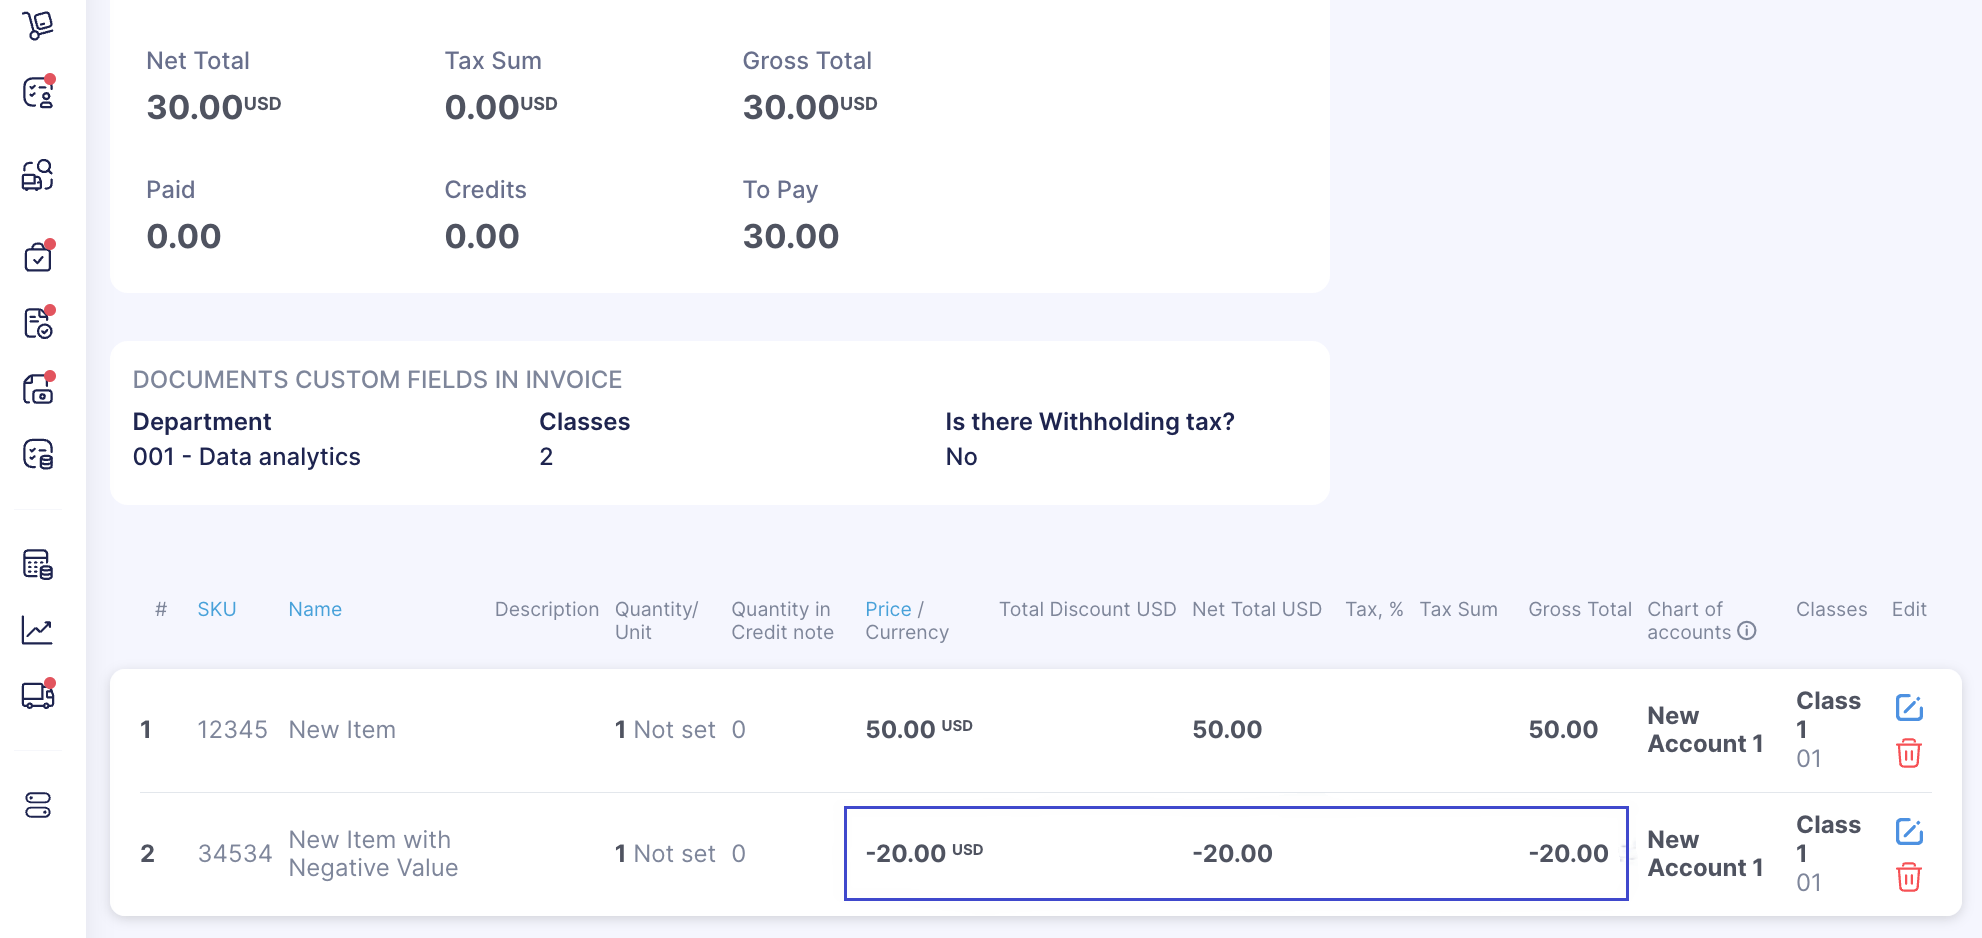
The ability to add negative item values in documents
You now have the ability to insert negative item values in various Precoro documents. This includes purchase orders, purchase requisitions, requests for proposals, and invoice documents. All users authorized to create documents and add items can use this functionality.
💡 Please note that the overall total of the document should remain positive to confirm it.
Some other important details to note:
- You can add taxes to items with negative values.
- Negative values can be incorporated when importing and updating items within files.
- You can view the negative item values in reports.
- When generating an invoice from a purchase order, ensure the total amount is above 0 to confirm.
- You cannot enter negative values in credit notes.
The option to auto-save items from documents
Enhance your productivity by automatically populating your catalog with items entered in documents. This feature is especially beneficial for frequently purchased items, as it eliminates the need for repetitive manual input.
You can add items to the catalog from the following documents:
- Purchase orders;
- Purchase requisitions;
- Requests for proposals;
- Invoices;
- Expenses.
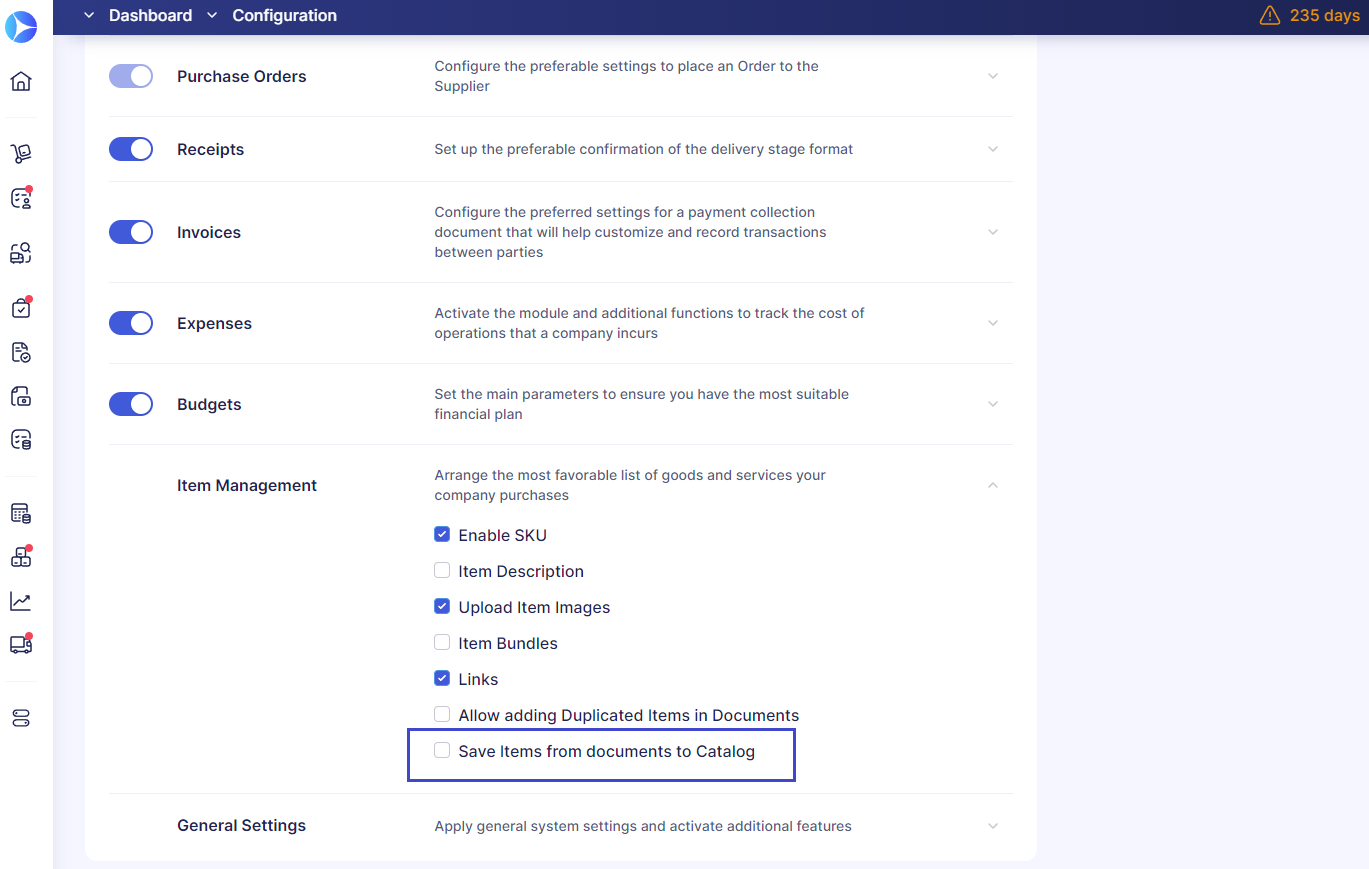
To set up this feature, please follow these steps:
- Navigate to Basic Settings → Documents Setup → Item Management;
- Mark the Save items from documents to Catalog checkbox and click Save.
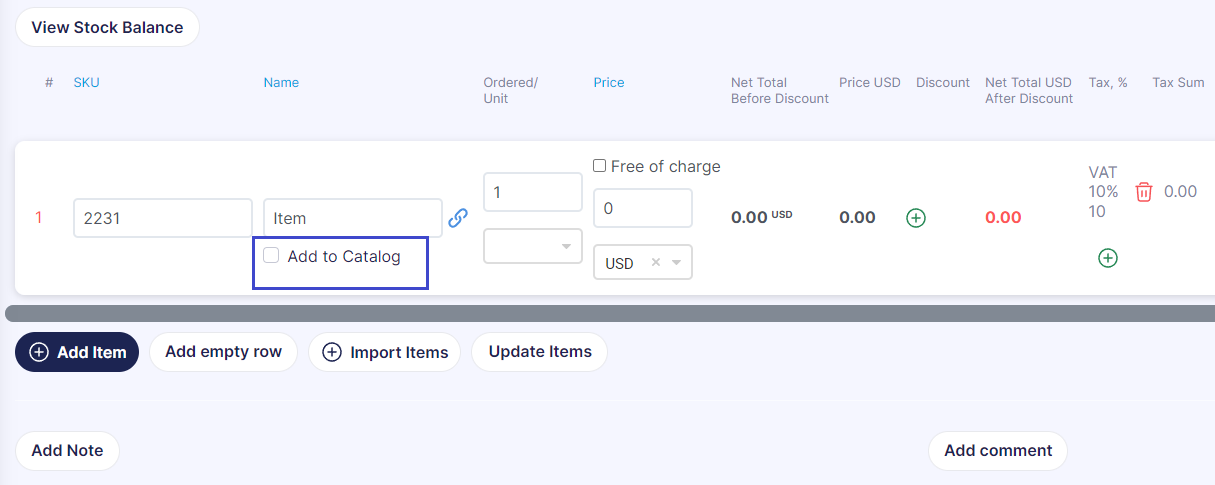
Once the feature is activated, an Add to Catalog checkbox will appear for each new item row that you create in a document. Simply check the box if you want to add the item to the catalog. Once selected, the item will auto-save with the specified details like price, currency, custom fields, and supplier.
Improved templates for importing and updating items
Last month we also introduced renewed templates for importing and updating items. Now you have the flexibility to enter either the Name or Code for the necessary custom fields in the file. There’s no need to fill out both fields anymore.
💡 To prevent any potential issues, ensure you have downloaded and are using these new templates.
New features for managing suppliers
Improved supplier registration form
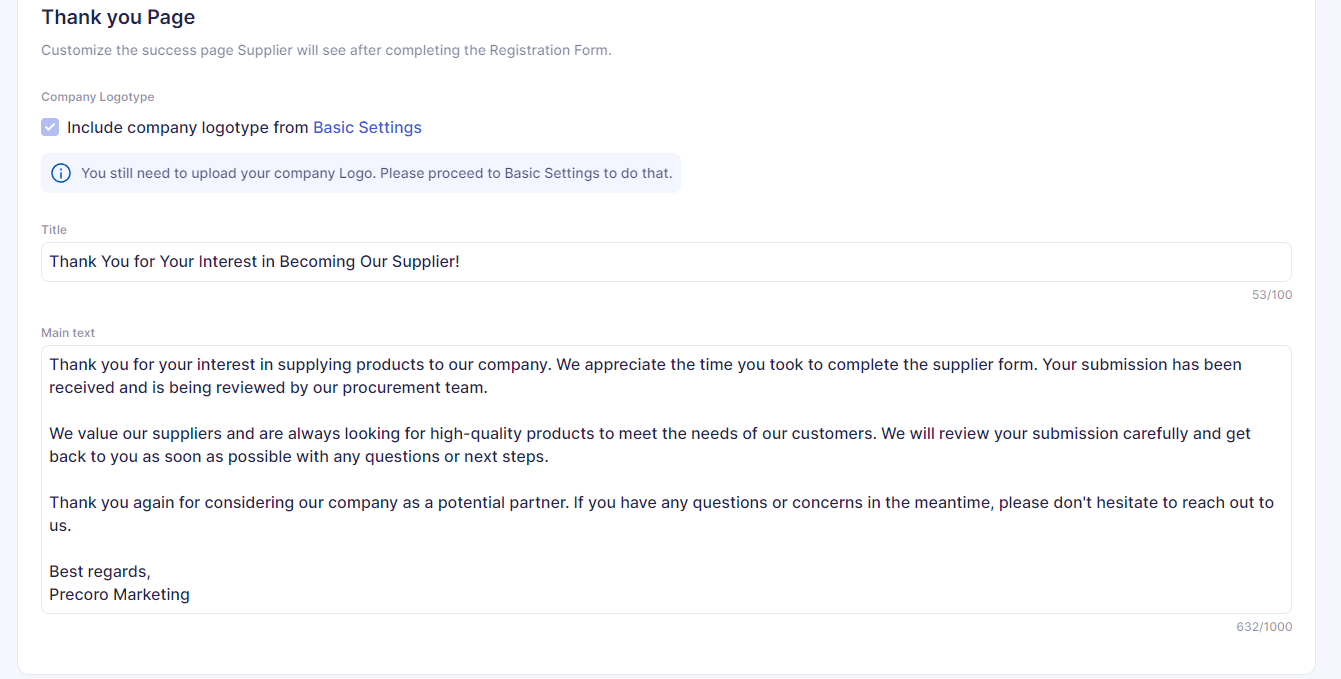
We've revamped the supplier registration form to provide a more engaging and informative experience for your company’s vendors.
Here are the new features that we’ve added:
- Display of your company's logo;
- Customized instructions for suppliers from your company;
- A personalized 'Thank You' page for suppliers upon form submission.
Enhanced templates for importing and updating suppliers
Starting with this update, you can use improved templates for importing and updating suppliers. Here’s what you can now do:
- Assign default supplier options within the file (e.g., taxes, custom fields for items or documents);
- Manage supplier OCR settings (activate or deactivate the Enter Invoice as one line checkbox);
- See more tips and guidelines for improving the accuracy of data entry.
💡 To prevent any potential issues, ensure you have downloaded and are using these new templates.
The option to revoke the Supplier Invitation form
You can now easily revoke any previously sent Supplier Invitation form. Simply head to the Sent Invitations page and click the Revoke the Form button in the action column. The form will be marked with the Cancelled status and will automatically be removed from the invitation list.
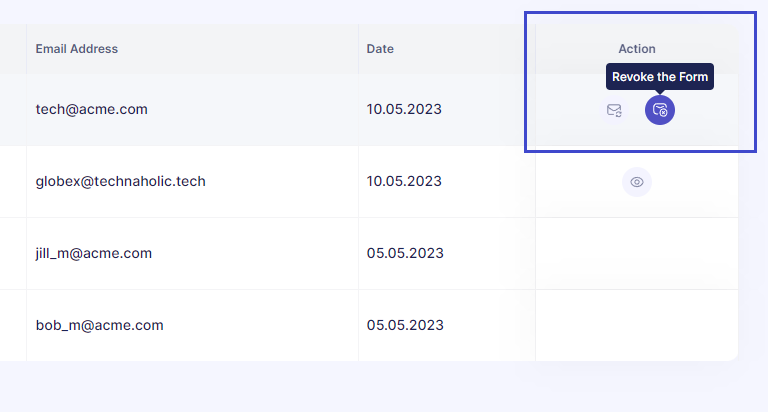
💡 Please note that this function is only available for forms that have either Sent, Pending, or In Revision statuses. If the supplier attempts to access the revoked form, they will encounter a message indicating that the form is no longer available for editing.
New in integrations
The ability to deactivate contact mapping in QuickBooks
Initially, whenever users reconnect or form a fresh connection with QuickBooks, Precoro automatically maps all accounting contacts from QuickBooks with purchasing contacts in Precoro.
For greater flexibility, we've introduced an option that lets you disable this feature. Just activate the Disable contacts for mapping checkbox on the Integrations page to do so.
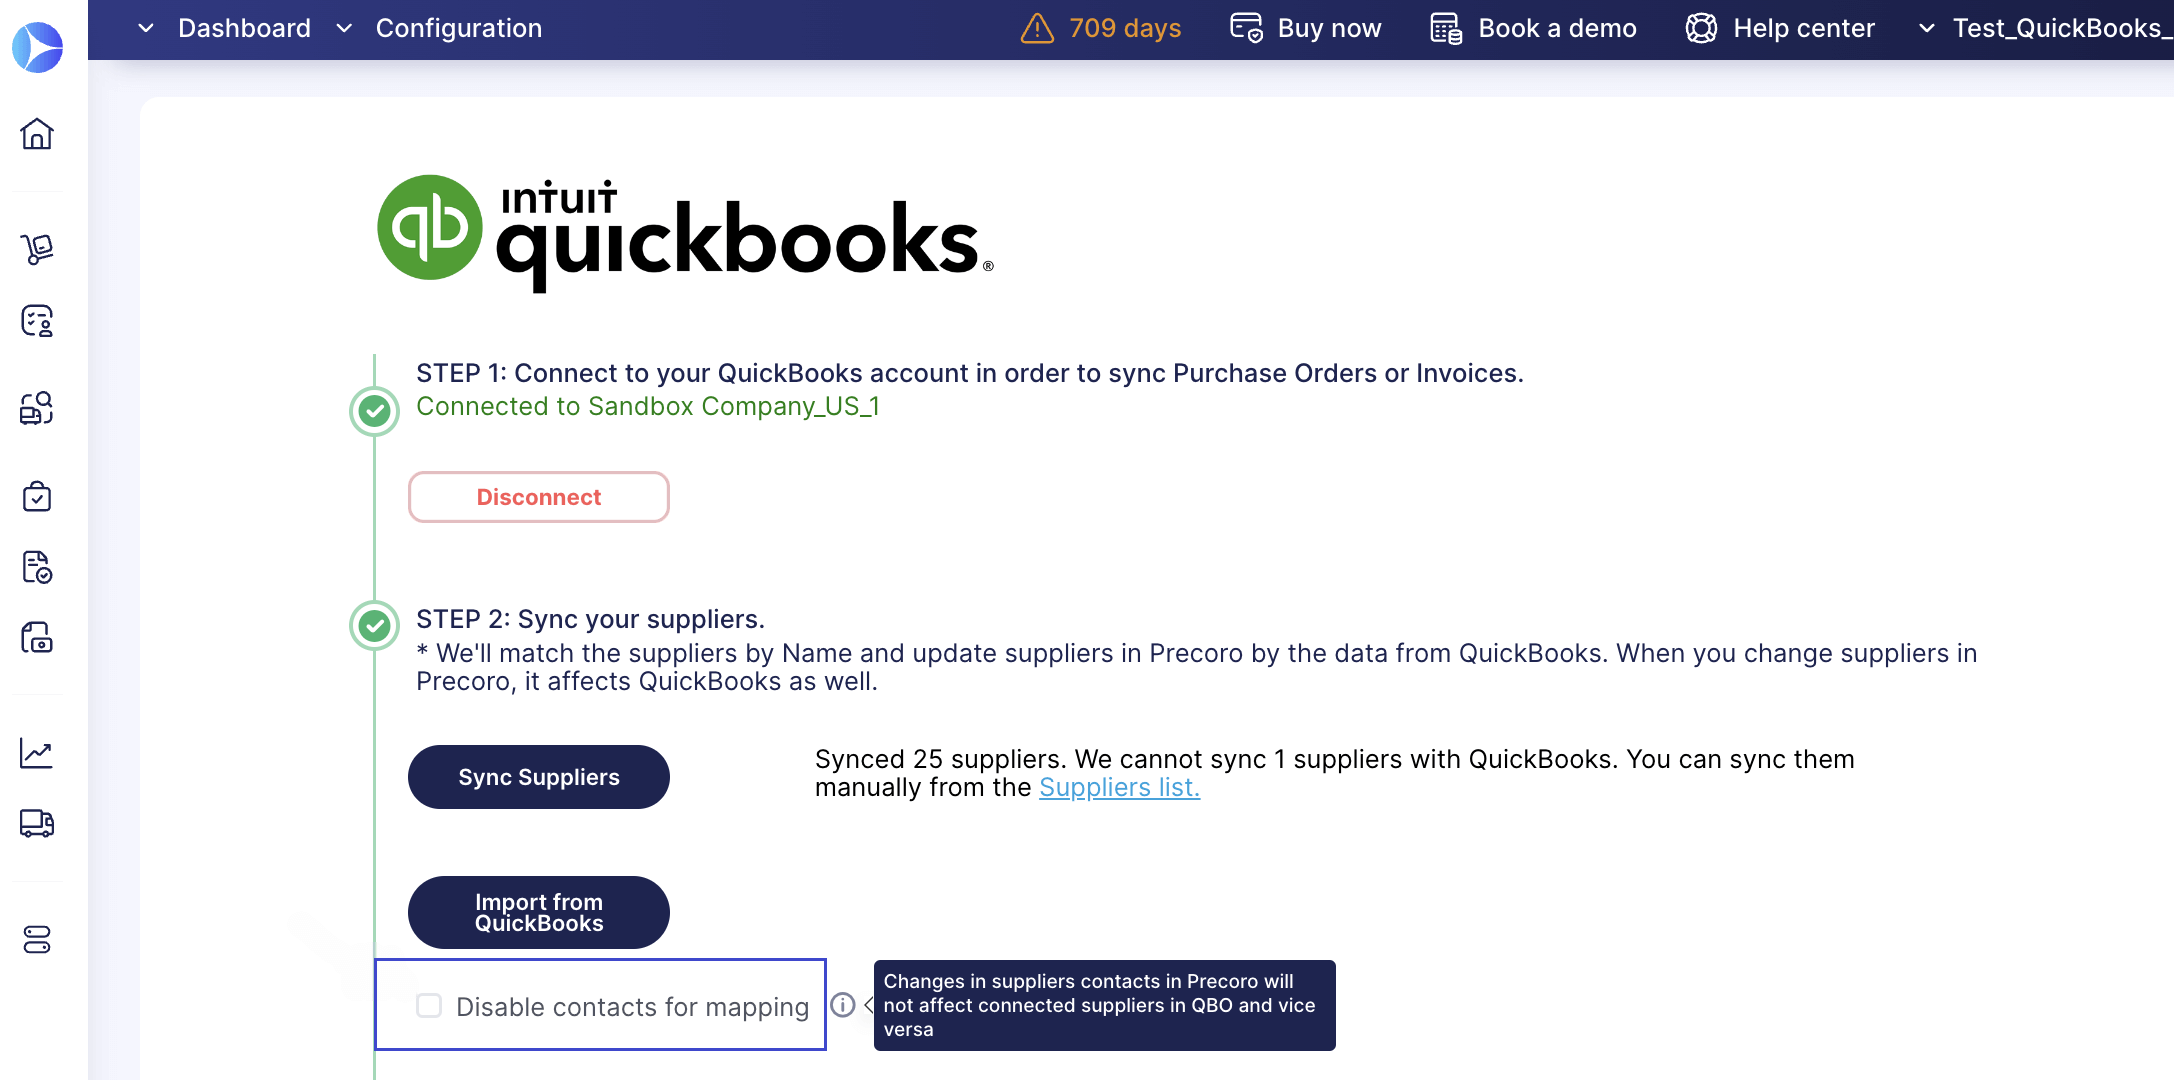
💡 Changes in Precoro will not affect synced suppliers in QuickBooks and vice versa.
Manual supplier mapping and unmapping for QuickBooks
On the Supplier Management page, you can now manually map and unmap suppliers that have been integrated with QuickBooks. To unmap, simply click on the cross icon in the Action field and you'll receive a system notification once the process is complete.
To map a new supplier, click on the mapping icon and the system will automatically match the corresponding entries.
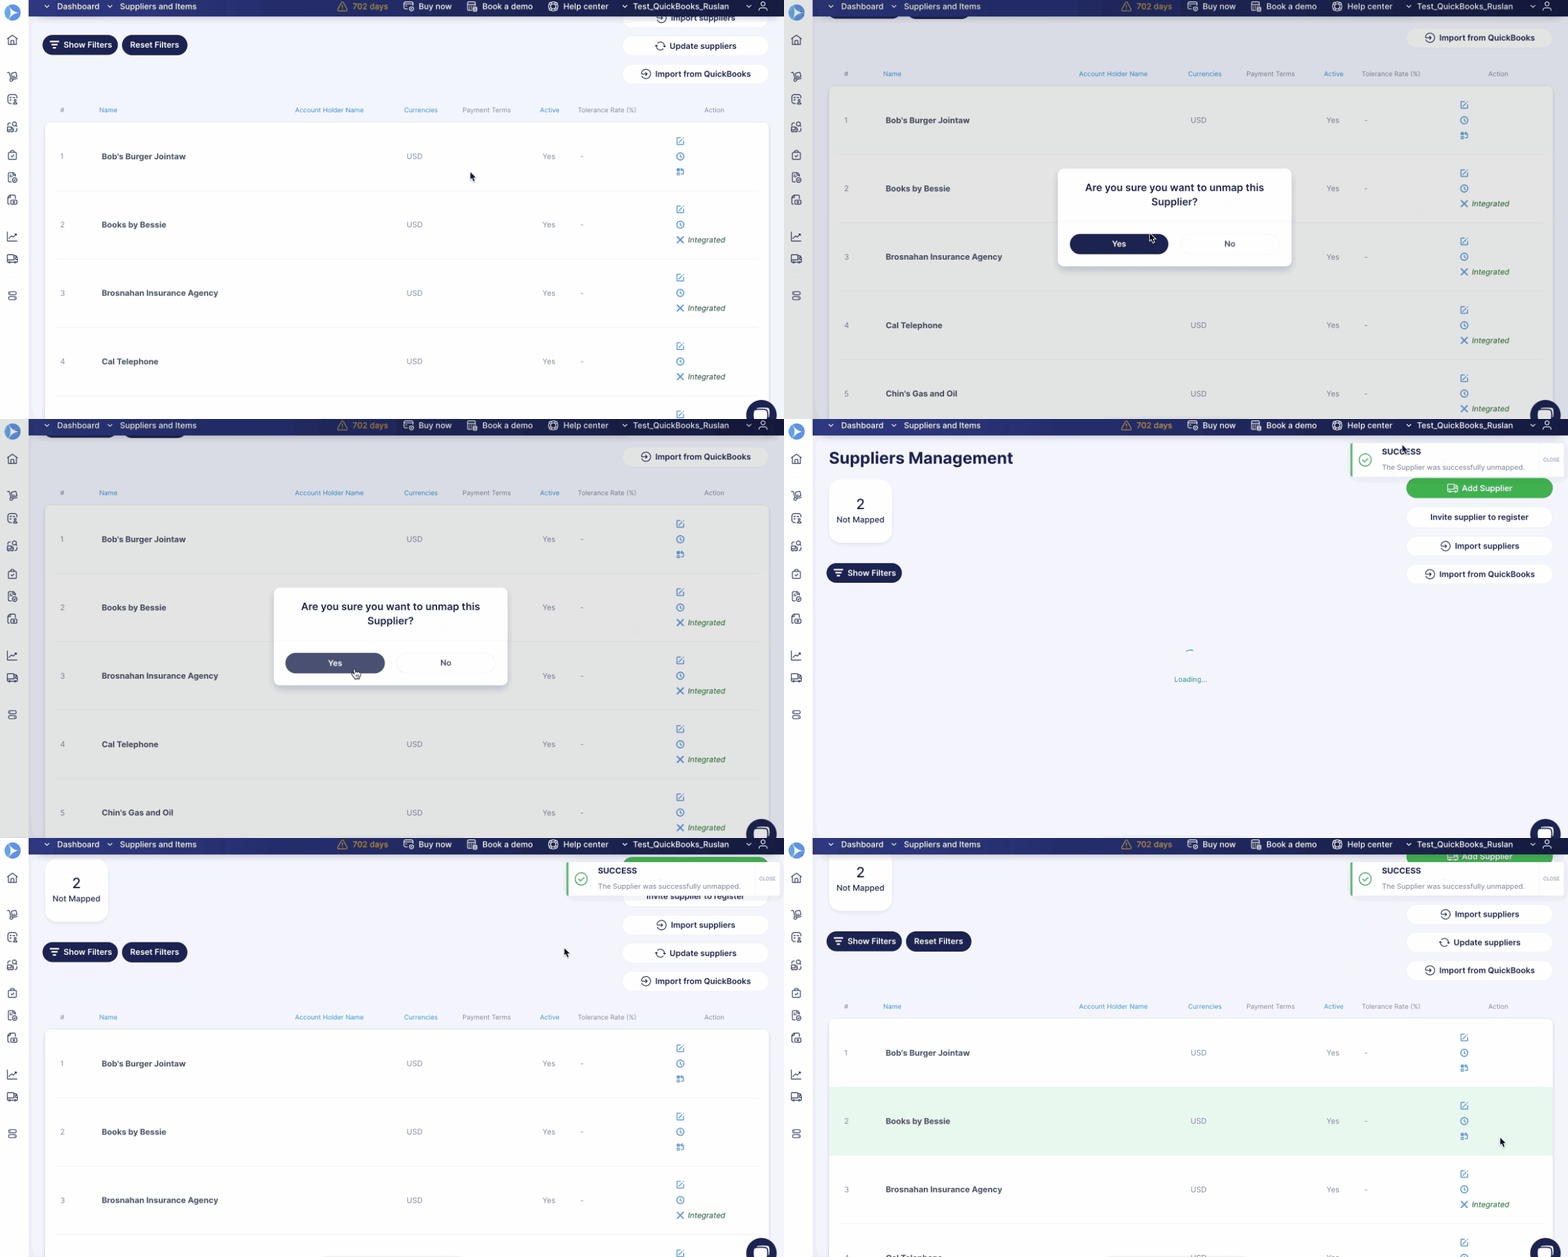
💡 Please note that for a supplier to be successfully synchronized with QuickBooks, there must be an exact match for the Name and Currency in both systems.
Improved search functionality for NetSuite, QuickBooks, and Xero
Working with NetSuite and Xero integrations has become even more efficient. Now you can use the search functionality when importing the following lists into Precoro:
- Chart of Accounts;
- Departments;
- Classes;
- Customers.
In the Import Chart of Accounts from NetSuite, you have the ability to search by both Name and Code. For all other import options, the search can be performed solely by Name.
💡 You can also search by the Name field when importing taxes from NetSuite.
Additionally, we’ve enhanced search functionality for Xero imports, now allowing matches by words, parts of words, or symbols across all integration lists.
Optimized tax and location import from NetSuite
You can now choose the taxes and locations you want to import from NetSuite.
To do so, please follow these steps:
- Navigate to the Integrations page and click on the Import Taxes or Import Locations button;
- Check off the taxes or locations you want to import;
- Press the Import button below.
Billable field import from NetSuite
Now you can now easily import billable values to Precoro and send documents with items that have this parameter to NetSuite.
Here’s how to do so:
- Head to the Integrations page and click on the Import Billable Field button.
- On the Items Custom Fields page, you'll find the newly integrated directory for NetSuite's Billable field. This directory includes two values: Yes and No. Additionally, it is automatically set as a required field for items and available for selection in purchase orders and invoices.
- Import the items with the Billable value into Precoro. Add these items to the document you intend to send, and when you export to NetSuite, the Billable value will be automatically incorporated into your document item.
Automated updates for NetSuite locations
Easily activate or deactivate automatic updates for NetSuite locations from the Integrations page. This functionality is designed to free you from the tedious and repetitive tasks of constant data updates.
💡 Updates occur weekly on Mondays.
To enable or disable auto-updating, simply utilize the toggle located on the left side of the Update Changes Automatically option. A blue toggle represents an active status, while a gray toggle indicates a deactivated status.
New integration with HiBob
We are excited to announce our new integration with HiBob. HiBob is a human resources information system software that helps companies manage and process employee information as well as HR-related procedures.
With this integration, you will be able to:
- Seamlessly import employee data from HiBob to Precoro, allowing you to configure user access to departments and roles, as well as set their user status (active or inactive). Moreover, you can synchronize existing Precoro users with those in HiBob for consistent data.
- Eliminate manual work with automatic data updates. Changes made to user information in HiBob will be automatically transferred to Precoro.
- Maintain an updated employee list, as Precoro will automatically disable any users who are deactivated in HiBob. This ensures data consistency even across multi-companies.
📖 Follow this link to our Knowledge Base to learn more about how the integration works and how to set it up.
Improved split screen view for OCR attachments
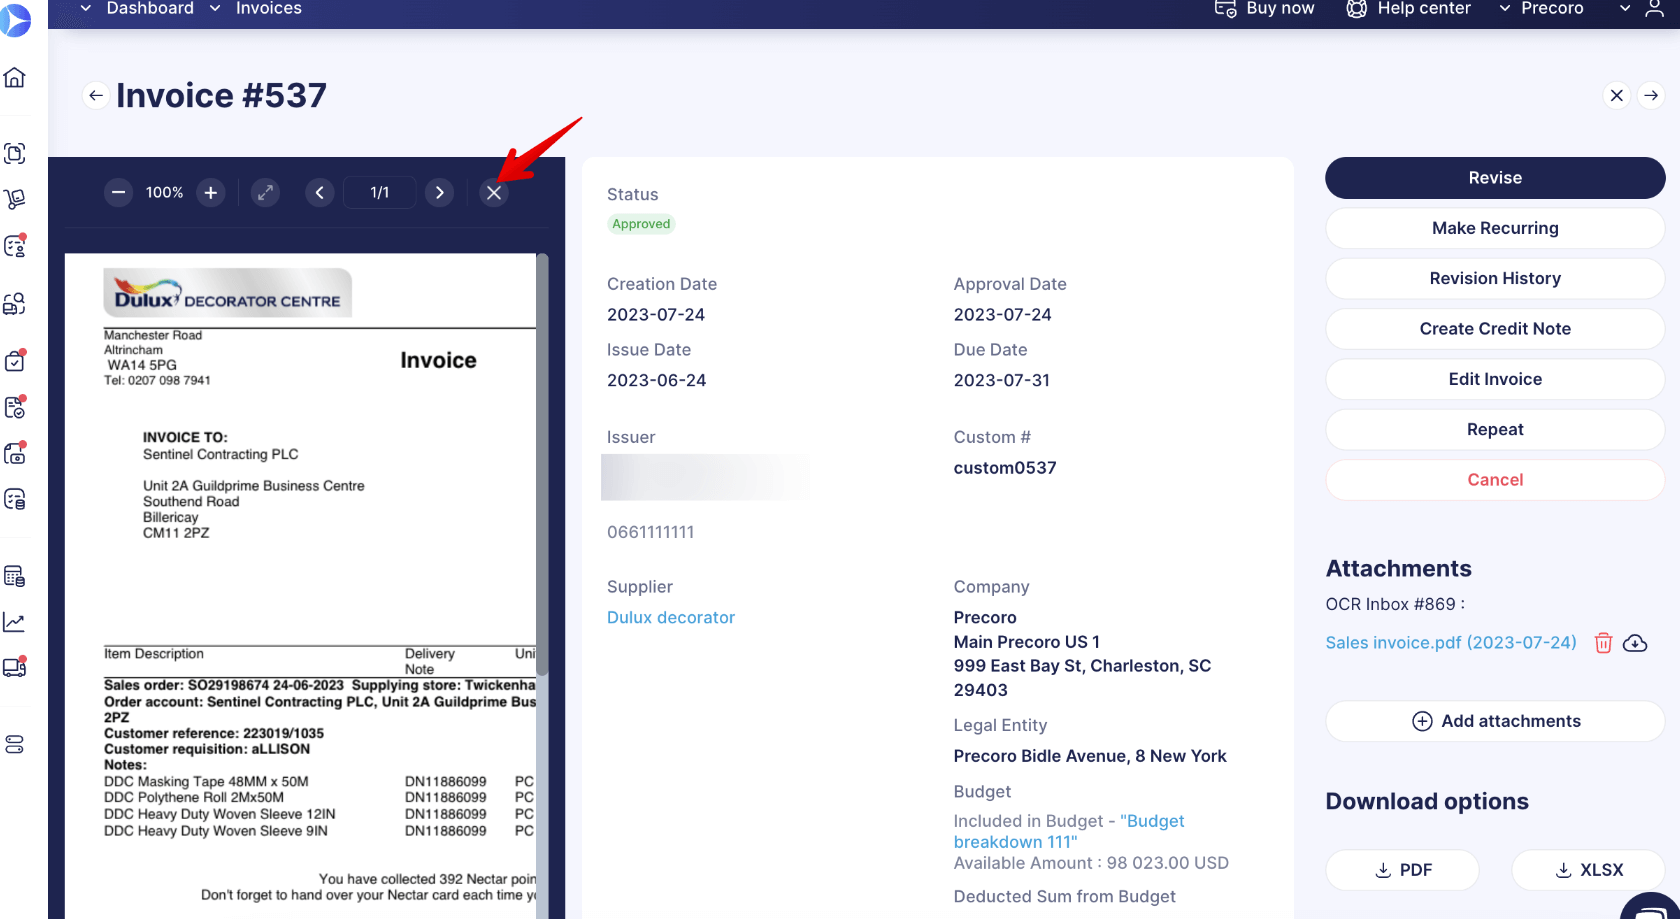
Working with OCR attachments has become even more convenient thanks to our enhanced attachment display on both the Create Invoice page and the page for creating invoices from POs.
The split-screen view now activates automatically for all documents created using OCR, eliminating the need for manual activation.
If you prefer the single-screen view, you can always manually disable the split-screen. Simply click the cross icon at the top of the attachment display.
Other upgrades
Re-approval initiation
We've updated the criteria for initiating the re-approval process. The process will now be set in motion under the following circumstances:
- When the total value of the document exceeds the tolerance limit.
- If there are alterations to the supplier information.
- In case of significant modifications that affect the approval flow, such as updates in locations or required custom fields for documents.
- When there are adjustments to custom fields for items that result in the modification of a budget.
📖 For more detailed information on the re-approval process in Precoro, please refer to our article here. If you want to learn more about tolerance limits, check out this article.
New page designs
You can now enjoy our improved Create Password and Update Password pages, designed to provide a more user-friendly and visually appealing experience.
Additionally, we’ve enhanced the design of the Requests for Proposals page for suppliers.
Location revoking for approvers
We have optimized the process for editing or disabling location access for approvers, making it quicker and more intuitive. You now have the ability to modify location access for approvers. When you withdraw a user's access to a certain location, it will be instantly removed from their location option within the approval workflow.
The ability to edit and remove comments in all documents
All Precoro users can now edit and delete their own comments across all documents. Once a comment is deleted, the system will display a message in place of the comment indicating the time and date of the removal.
Improved filtering
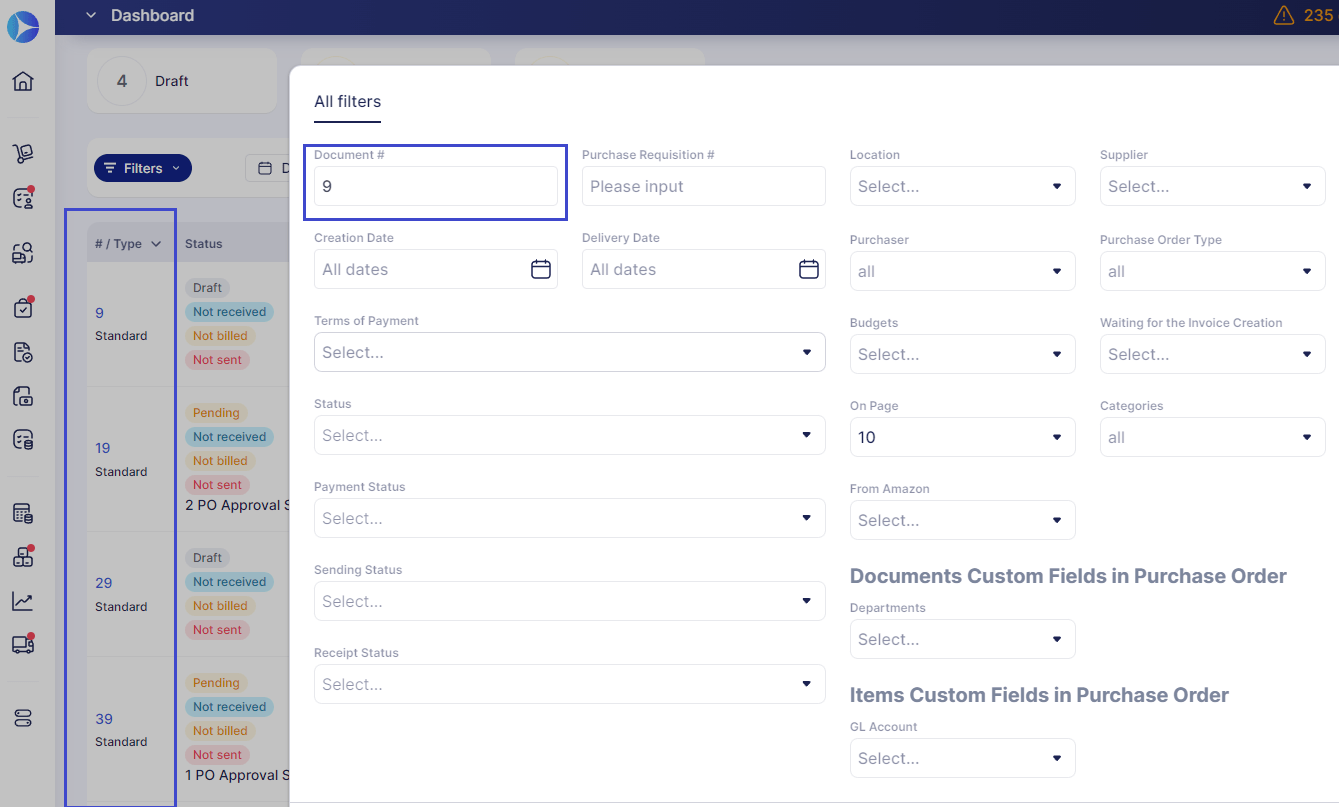
We've upgraded our filter functionality. Now, it's designed to identify and match even partial segments within the Document Number field.
Though this update is complete, our journey of enhancements continues 😉. Stay tuned for more exciting features that are currently in the pipeline.


