
9 min read
Product Update, February 2024
Check out more than a dozen new and improved features in Precoro — from assigning specific approvers for individual requesters to enabling recurring service orders.
Precoro presents our latest series of product updates. Please feel free to explore at your leisure or navigate directly to the updates that most interest you:
- Document Initiator condition in the Approval Workflow
- The ability to create recurring service orders
- New in item management
- New in integrations
- Streamlined tracking of documents and invitations
- Other updates
Added Document Initiator condition in the Approval Workflow
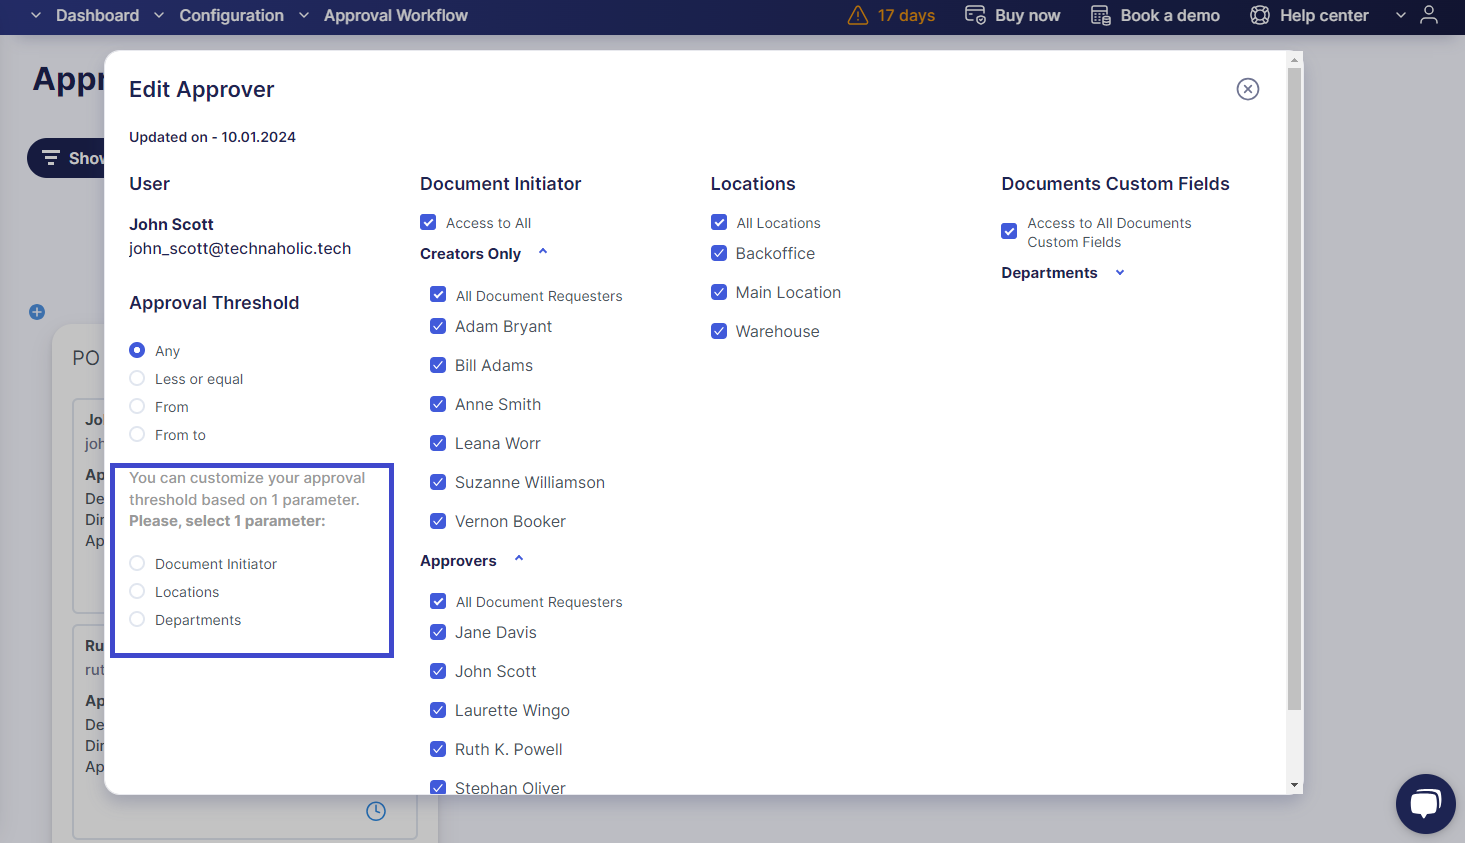
Our latest update introduces the option to designate specific approvers for individual requesters. This feature is especially useful for companies who want to ensure that requesters are getting approval from their respective managers. To activate this feature, navigate to Configurations → Basic Settings → Approval, and mark the Enable Direct Manager Approval checkbox.
How it works:
- When adding or changing an approver, you'll see a list of document initiators. The All Document Initiators option is the default choice.
- The list can be filtered to show Creators Only (users with the Create or Approve role that are not in the approval workflow) or Approvers (users with both Create and Approve roles present in the workflow).
- You can also customize the approval threshold for each requester by clicking on Customize threshold > Document Initiator.
💡 Important to note:
- Changing a document's creator may require reapproval if it impacts the workflow.
- Super Users can still approve documents under direct manager approval.
- The Parallel Workflow feature remains unaffected.
📖 To learn more about the Direct Manager Approval feature, please refer to our Knowledge Base.
The ability to create recurring service orders
Service Order (SO) is a document type in Precoro specifically designed for conveniently ordering utilities and services. Given that many services are billed on an annual or quarterly basis, we introduced a feature that enables SOs to be set as recurring and integrated with your budget for improved spend management. To activate the feature, navigate to Configuration → Basic Settings → Document Setup → General Settings, and mark the Recurring Documents checkbox.
💡 Please note:
- Service orders with an active Budget Breakdown feature cannot be set to recur.
- You cannot make an SO's invoice recurring if the invoice already has a related PO in the system.
To create a recurring service order:
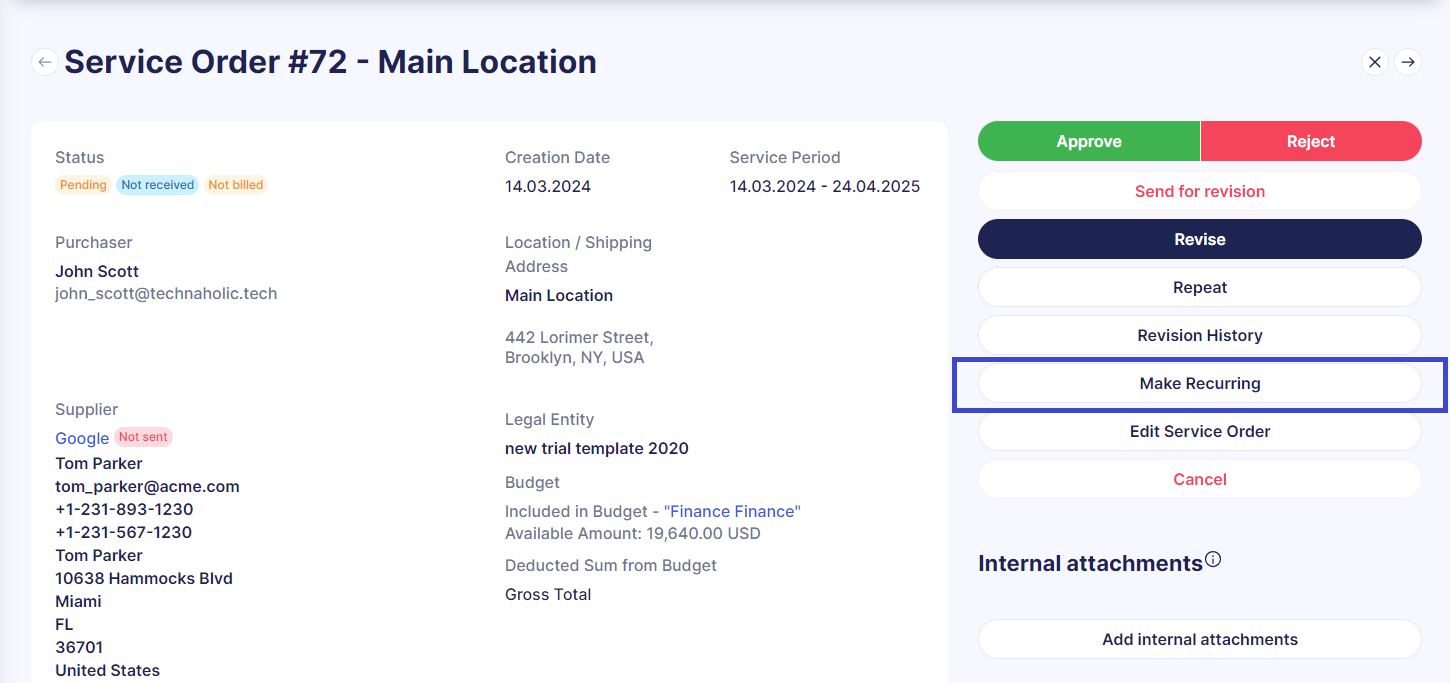
- Open a service order document and click Make Recurring on the action panel.
- Define the Validity Period and select how often the SO should recur.
- Choose budgets for future orders. Use Apply to All to quickly assign budgets to all periods.
- Click Save.
Precoro will automatically generate a new SO based on the specified start date and submit it for approval. When a budget is selected for an SO, Precoro reserves the necessary amount based on the SO's total.
New in item management
The ability to add items that don’t trigger the matching process
We've introduced a new feature that simplifies adding items to invoices. Now you can bypass the automatic initiation of the matching process under the following conditions:
- When you add new items with positive prices that don't exceed the Tolerance Rate.
- When you add items with negative prices.
To activate this feature:
- Go to Configuration > Basic Settings > Documents Setup > Invoices;
- Mark the Adding New Items Without Matching checkbox.
📖 For more details on how the matching process works in Precoro, please click the link to this article.
The option to add service items to the catalog from documents
Enhance your workflow efficiency by directly adding items to the catalog from the service order or related invoice documents.
To be able to use this feature:
- Enable the Save Items from Documents to Catalog feature in Configuration → Basic Settings → Document Setup → Item Management.
- Make sure you have the Suppliers and Items role.
To add items to the catalog:
- Mark the Add to Catalog checkbox in the item line.
- Click Save.
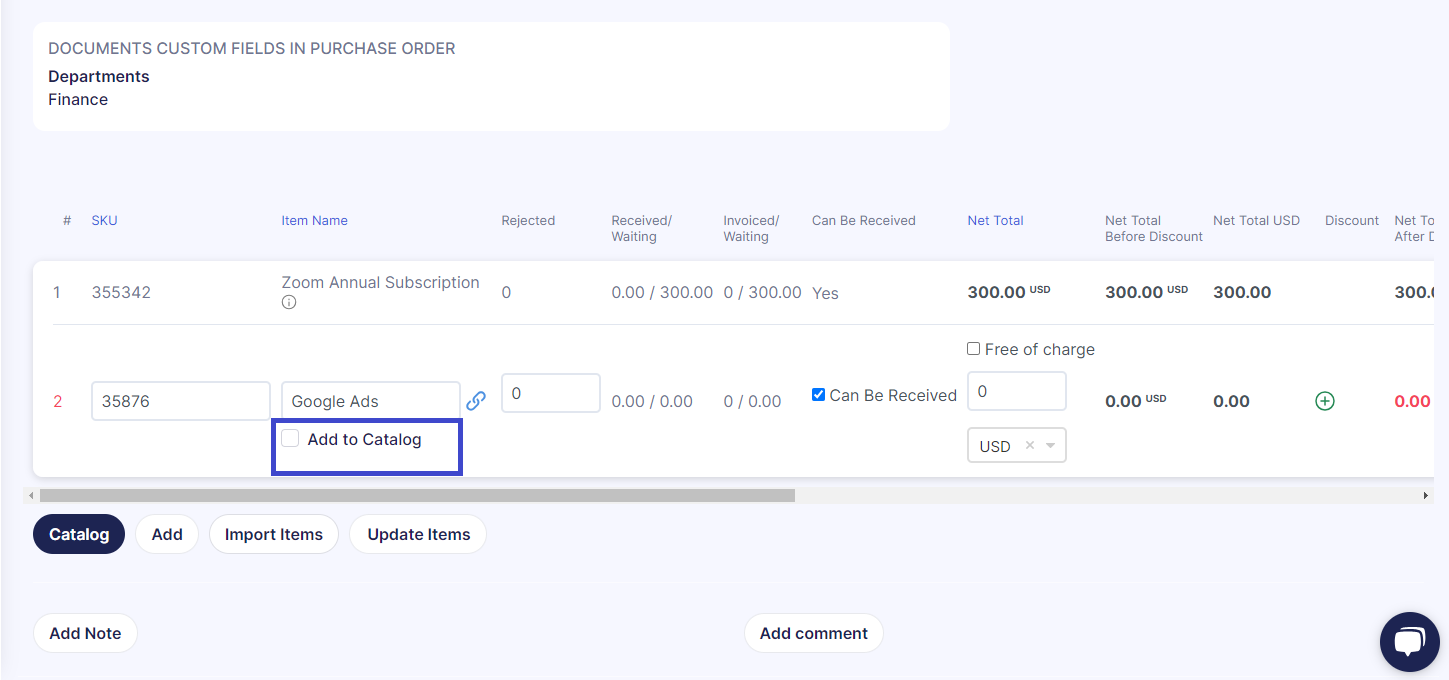
Once saved, the item will be categorized as a Service type in the catalog, with information like SKU, name, description, net total, and supplier details automatically populated.
Improved process for importing and updating catalog items
We've streamlined the process for importing and updating items in the catalog, making it more intuitive and time-efficient. Here's what's new for the import template:
- New columns for Item Bundles and Item Groups have been added.
- Free-of-charge items can now be imported with a price set to 0.
- The Category field is editable during the import verification step, allowing for adjustments before the final import.
- Error feedback has been standardized: fields with issues are now highlighted in red to identify and correct them easily.
- Incorrectly filled optional fields will be imported as empty but can be edited on the verification page before completing the import.
We've also streamlined the item update process by enhancing error notifications. Now, when you upload a file with incorrectly completed fields, all the error flashes will be displayed on the screen at once. Additionally, we clarified the descriptions for SKU and ICF errors and standardized error messages, with problematic fields now highlighted in red for easy identification.
New in integrations
The ability to map credit notes with QuickBooks
Streamline your financial processes by linking Credit Note documents with QuickBooks. To enable this feature, just follow these simple steps:
- Navigate to the Integration page, and within Step 6, choose Approved Invoices.
- Mark the Send Credit Notes checkbox and click Save.
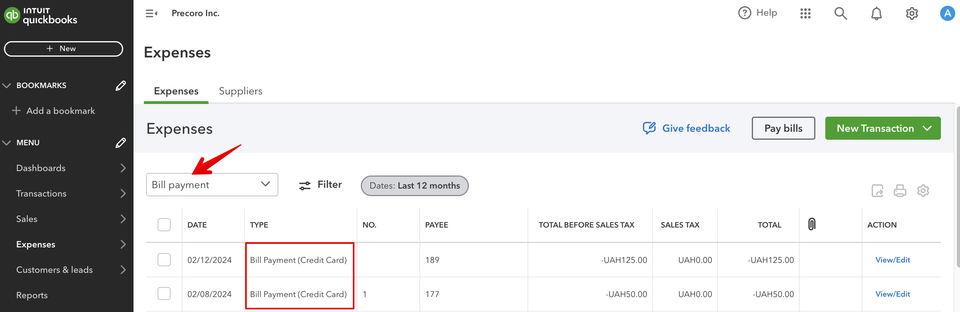
Once activated, the Send to QuickBooks button will appear on Credit Note documents. Integrated Credit Notes are accessible in QuickBooks, filed under Bill Payment transactions as Credit Card type expenses.
The option to add multiple credit notes to an invoice through OCR
You can now utilize OCR technology to attach multiple credit notes to a single invoice. This is particularly beneficial when a single credit note does not fully cover the outstanding amount of an invoice, and additional credit notes are required to settle the balance.
To use this feature, please follow the steps below:
- Go to the AP Inbox page, select a document from the list, and click the Create Document button.
- Choose the Credit Note type and proceed to select the invoice you wish to apply it to.
- Pick the item that the credit note will apply to and enter the required information.
- Return to the AP Inbox page, select another document, and repeat the process to create an additional credit note.
- When selecting the invoice this time, the system will show the previous invoice as an option where you can add another credit note for any remaining items.
Please note:
- You can continuously add different documents from the AP Inbox to an invoice, but you cannot add the same document more than once.
- This feature requires that the invoice includes more than one item. The system permits attaching only one Credit Note per item, regardless of its payment status (fully or partially paid).
Enhanced user integration visibility with NetSuite and Slack
We've made enhancements to the User Management page to improve how you monitor integrations with both NetSuite and Slack. With the introduction of NetSuite Integrated and Slack Integrated filters, you can now select Yes to view users who have integrated with either NetSuite or Slack, or choose No to see those who haven't. For further ease in management, the Not Mapped with NetSuite and Not Mapped with Slack info cards were introduced to filter out and display users lacking integration with the respective platforms.
Improved status updates for Amazon and Afaxys purchase orders
We've updated the status indicators for POs sent to the Amazon and Afaxys marketplaces. Now, the In Processing status shows that a PO is on its way to the marketplace but hasn't been received yet. If a PO is successfully dispatched, it changes to the Sent to Marketplace status. If a PO fails to reach the marketplace, it's marked as Not Sent to Marketplace, making it easier to spot and address these issues promptly.
OCR Improvements
We've updated our OCR settings to include an option for entering tax as a separate line item. This is particularly useful if your company's Basic Settings have taxes disabled but your document specifies a tax amount. In such cases, the tax will be listed as its own item, labeled as "TAX {tax rate}", and will include the specified tax amount from the document. For documents with multiple tax rates, the system will generate a distinct line item for each tax rate. To enable this feature, please reach out to our Support Team.
Additionally, you can choose whether to receive email updates about the attachment processing status through OCR. To customize this notification, go to Email Preferences > MISC, and select the Document has been processed with OCR checkbox as per your preference.
Better tracking for undelivered documents and invitations
To improve operational efficiency and communication clarity, we've introduced several updates designed to streamline the tracking of undelivered documents and invitations across the platform. Here’s what’s new:
Undelivered documents to suppliers
To better manage documents that fail to reach suppliers, we've implemented the following enhancements:
- We've added info cards named Undelivered POs to Suppliers and Undelivered RFPs to Suppliers to help identify orders and proposals that haven't been successfully emailed. You can find these info cards on their respective management pages. It's important to note that POs delivered to at least one supplier won't be shown in the info card.
- A new setting has been added under Email Preferences in the Suppliers section, enabling you to activate notifications for when your emails from Precoro fail to reach your suppliers.
Undelivered registration invitations to suppliers
We've enhanced the system for tracking undelivered invitations to suppliers with these updates:
- You can now find email status indicators (Not Sent, Sent, Opened) under supplier emails on the Send Invitations page.
- The Sent Invitations page now features an info card titled “Undelivered Request Form to Suppliers”, specifically designed to highlight any invitations that failed to reach suppliers. Additionally, receiving the Not Sent status for any invitation will trigger an automatic notification to your inbox, ensuring you're immediately aware and can take necessary action.
Undelivered emails to company users
You can now also monitor undelivered emails to company users with new features:
- The Failed status is now visible for bounced letters on the user management page.
- The Undelivered Invitations info card has been added to the system to quickly spot users with failed invitation statuses.
Undelivered Supplier Portal invitations
To enable more intuitive management of invitations to the Supplier Portal, we've implemented a series of enhancements:
- The invitation page layout has been improved for better visibility and ease of use.
- Added new statuses to track the progress of invitations more comprehensively: Sent, Opened, Registered, and Failed.
Other updates
Enhanced Document Custom Forms feature
We've enhanced our document custom forms to give you the option to set custom fields as mandatory or optional. Additionally, you can now create dependencies with other fields, determining when they are shown or hidden.
📖 For more details on using the Document Custom Form feature, visit our Knowledge Base article.
Improvements to the Payment Type filter
Last month, we refined the filtering process within the Payment Type filter on the Payments page to improve usability and precision. Here's a brief overview of the updated filter options:
- All Prepaid Docs: Shows all documents with prepayments.
- Prepayment Without Paid Invoices: Lists prepaid POs that either have no related invoices or are associated with invoices that are not fully paid or are partially paid.
- Invoice Credit Note: Displays credit notes used to settle invoices.
- Credit Note for Prepaid PO: Shows credit notes linked to POs in the Prepaid status, which may or may not have related invoices.
- Invoice and PO Credit Notes: Lists credit notes associated with POs in either Partly Paid or Paid status, and must have related invoices in Approved, Partly Paid, or Paid status.
Better email communication with suppliers
We made it easier to track PO and receipt emails that get sent to suppliers. Now, you can send a PO and receipts to multiple email addresses at once and receive individual status updates for each. Should an email fail to reach its recipient, it will be marked with the Failed status.
Unified info card display
To streamline access to information that requires your attention, we've relocated all info cards to the new Dashboard page.
Super User Update
Now, Super Users can mark purchase orders, purchase requisitions, and requests for proposals as completed even if they don’t have approval roles for these types of documents.
Enhanced display for pending receipt quantities in POs
We've enhanced the Purchase Order interface by introducing the Quantity in Pending Invoices column. This column shows the number of items waiting on invoices that can't move forward because they're awaiting receipt. If no items are being blocked, the column will not be displayed.
Inactive locations are no longer selectable for new documents
Now, inactive locations are hidden from the selection options when you create new documents. However, if you're generating a PO from a PR or an invoice from a PO and have used an inactive location in the past, this location will remain available for selection in these specific scenarios.
The ability to hide prices for specific receipt roles
We've introduced a feature that allows users to hide prices in receipt documents. By navigating to Configuration → Basic Settings → Document Setup → Receipt and enabling the Do not Display Prices setting, users assigned the roles for creating or approving receipts won't see item prices in the document preview. It's important to note, however, that for service order receipts, the Net Total amount will remain visible even with this setting activated.


